How To – Yellow Highlighters: UV-Reactive Trail Marking for Dusk Navigation
By Predicament Measures
Quick Answer: Can yellow highlighters be used as UV reactive trail markers for dusk navigation
Yes, yellow highlighters can be used because their fluorescent dye glows under UV light making marks visible in low light when illuminated with a suitable UV torch but they require a UV light to be seen and are less durable than purpose made reflectors
- Effectiveness: Estimated effective detection range about 5 to 30 meters under a 365 nm UV torch, with an approximate 2 to 5 increase in visible contrast under UV versus the unaided eye in low light
- Cost: Highlighters: about $0.50 to $2 each; 365 nm UV pen torch: $10 to $60. Cheaper per unit than battery-powered LED markers ($15 to $50) but generally less durable than reflective tape ($0.50 to $3 per meter)
- Time: Marking speed roughly 1 to 2 minutes per 10 meters; marking 100 meters typically takes about 10 to 20 minutes depending on terrain and attachment method
- Limitation: Cannot be seen without a UV light; visibility drops in rain, bright ambient light (daylight), or heavy dust; marks are temporary, not tamperresistant and unreliable beyond 30 meters or as a legal substitute for official signage
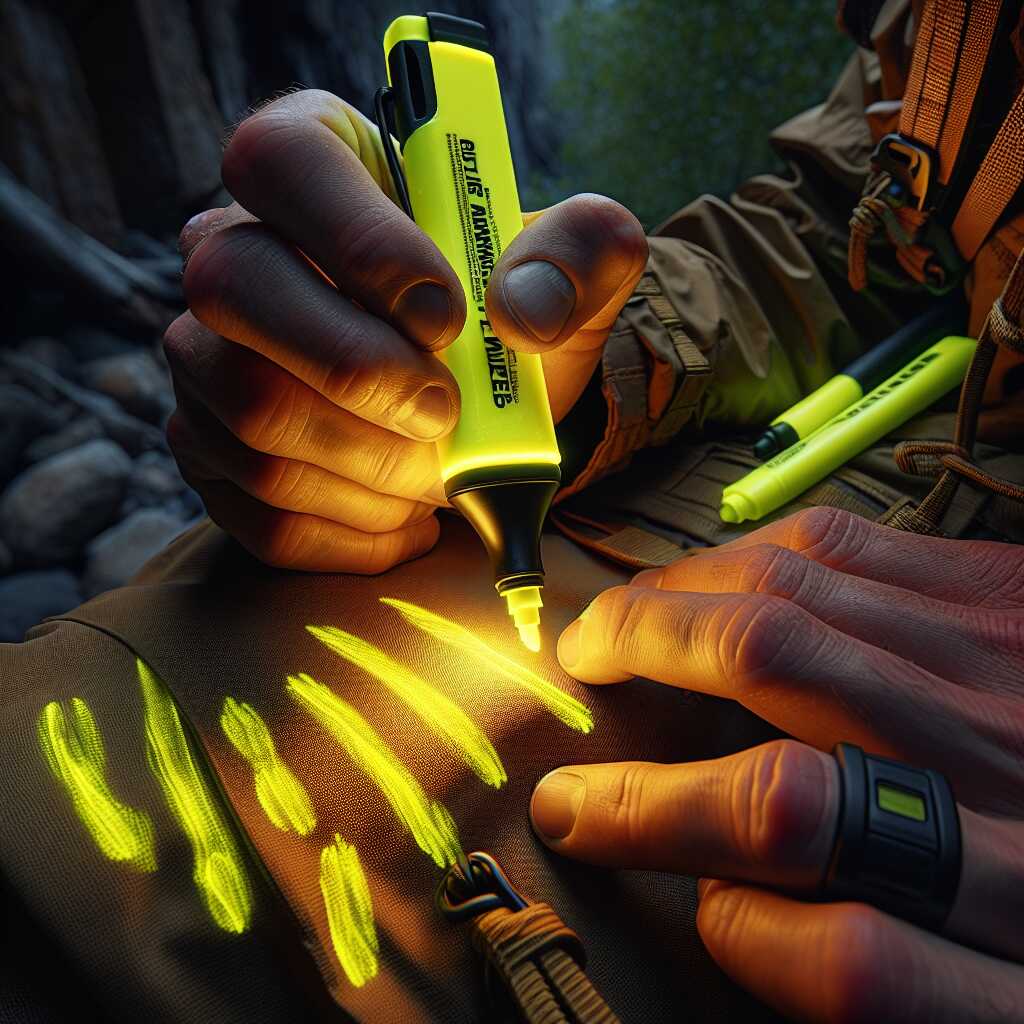
Yellow highlighter is a pen-style applicator that deposits fluorescent dye designed to glow under ultraviolet (UV) light; it is commonly used for marking text but can be applied to some outdoor surfaces for temporary wayfinding. This $0.50-$2 per highlighter solution, when paired with a 365 nm UV pen torch ($10-$60), offers a lower-cost temporary marking option compared with battery-powered LED markers that typically cost $15-$50 each.
The process works through three key relationships: fluorescent dye in the yellow highlighter fluoresces under 365 nm UV light resulting in an approximate 2-5 increase in visible contrast in low light, a handheld 365 nm UV torch illuminates marked surfaces enabling detection at roughly 5-30 meters depending on torch power and ambient light, and applying ink to bark, fabric, or rock adheres sufficiently to create rapid temporary markersabout 1-2 minutes per 10 metersuseful for short-term navigation or emergency wayfinding.
How to prepare and use yellow highlighters as UV-reactive trail markers step by step
- Gather required materials (5-10 minutes): Collect 1-5 yellow highlighters ($0.50-$2 each), a 365 nm UV pen torch ($10-$60), small pieces of flagging tape or zip ties (optional), nitrile gloves, and a scrap surface for testing. Result: You have a compact kit for temporary dusk navigation.
- Test marker fluorescence (1-2 minutes per sample): On a scrap of bark, fabric, or rock, make a 1-2 cm mark with the highlighter. In low ambient light, illuminate the test mark with the 365 nm torch from 0.5-2 m and observe brightness and legibility. Result: Confirms whether that highlighter + torch combination yields visible contrast and estimates practical detection distance (typically 5-30 m depending on torch lumen output and beam focus).
- Select marking method and surfaces (2-5 minutes per site): Prefer rough bark, porous rock, or fabric where ink adheres; avoid smooth, oily, or very wet surfaces where marks smear or wash off. Use small dots (5-10 mm) or short arrows; for fabric/trees you can also tie a short strip of flagging tape with a small highlighter mark next to it. Result: Marks that adhere longer (hours to days in dry conditions) and are easy to spot under UV.
- Plan spacing for visibility (time variable; plan before walking): In dense or low-visibility terrain use 5-15 m spacing; in open terrain 15-30 m spacing may be acceptable. Mark consistently (height 1-1.5 m from the ground for line-of-sight) and alternate sides of the trail for directional cues. Result: A continuous visual line under UV that helps maintain route orientation; marking 100 m at 1-2 min per 10 m takes 10-20 minutes.
- Mark quickly and discreetly (1-2 minutes per mark cluster): Make compact marksdont over-apply ink. If leaving critical waypoints (campsite, junction), use two marks or a short arrow. Document GPS coordinates or take smartphone photos of marked points as backup. Result: Temporary, low-impact markers that are visible with UV and reduce chance of accidental erasure.
- Navigate using a UV torch (as needed while traveling): When following the route at dusk, scan ahead and to the sides with the 365 nm torch. For best results hold the torch 30-120 cm from likely marker locations; beam power and focus determine useful detection to 5-30 m. Result: Marked route becomes visible under UV; keep beam movements slow to reduce missed marks.
- Account for weather, daylight, and surface limits (ongoing): Expect reduced visibility in rain, fog, heavy dust, or full daylight; marks on wet or porous surfaces may fade or wash off in hours to days. Do not rely on highlighter marks alone as a sole navigation systemuse map, compass/GPS, and physical trail markers where available. Result: Proper risk management and realistic expectations for marker longevity.
- Limitations and contingency planning (5-15 minutes to prepare backups): Know what highlighters cannot do: they are invisible without UV light, not durable like reflective tape, not a legal substitute for official signage, and unreliable beyond 30 m. Prepare backups such as reflective tape ($0.50-$3 per meter), chemiluminescent glow sticks, or small LED markers ($15-$50 each) and brief the group on fallback navigation procedures. Result: Safer navigation with redundancy if UV markers fail.
- Remove or minimize environmental impact (5-30 minutes when breaking camp): Wherever possible remove marked tape and avoid permanent marking of sensitive surfaces; highlighter ink is temporary but may stain. If marks must remain for safety during active SAR operations, coordinate with land managers for removal later. Result: Reduced long-term environmental impact and compliance with Leave No Trace principles.
FAQ
What is a yellow highlighter and how does fluorescence work
A yellow highlighter is a felt-tip marker that contains fluorescent dye which absorbs shortwave light and emits bright visible yellow-green light so the mark stands out under UV illumination. The fluorescent dye in a yellow highlighter typically absorbs light in the near-UV to blue range and emits light in the green-yellow band, which gives clear visual contrast against natural backgrounds when a UV torch is used. A yellow highlighter costs about $0.50 to $2 each and provides a low-cost, lightweight, temporary trail marking option that requires testing, review, and careful handling for reliable use.
What UV wavelengths and dye types make it glow brightest
A 365 nm UV source often makes yellow highlighter dyes glow brightest, with useful results also possible with 385-395 nm UV torches depending on dye and lamp power. Many yellow highlighters contain dyes such as fluorescein that emit in roughly the 500-530 nm range; emission strength depends on dye chemistry, ink formulation, and exposure to light. A UV torch rated 365 nm and 100-1000 mW output will increase visibility and helps in practical field testing and comparison of marker performance.
How do you use yellow highlighters step by step for trail marking
Prepare by carrying yellow highlighters, a 365 nm UV pen torch ($10 to $60), waterproof tape, and zip ties so you can mark and protect signs quickly on the trail. Select stable surfaces such as rock edges, tree trunks, or reflective flagging spots and apply 2-5 cm bright strokes or wrapped tape marks that take about 1 to 2 minutes per 10 meters to lay out in typical terrain. Practice on a short section to test reliability, timing, and attachment methods and record results so teams can review, refine, and ensure safe use in real emergency wayfinding situations.
What distance spacing and marking size should you apply per 10 meters
Place marks every 5-10 meters in dense vegetation and every 10-30 meters in open areas to balance speed and detection chances, aiming for a mark size of about 2-5 cm or two short strokes per marker. These spacing choices match an estimated detection range of roughly 5 to 30 meters under a 365 nm UV torch and keep marking time near 1-2 minutes per 10 meters. Users should test spacing and marking size on their route so field experience and simple data guide final placement for better reliability.
What are the main benefits of using yellow highlighters for dusk navigation
Yellow highlighters provide a low-cost, lightweight way to create UV-reactive trail markers that make paths easier to follow in low light when paired with a UV torch. Cost for this system is about $0.50 to $2 per highlighter plus $10 to $60 for a 365 nm UV pen torch, which is cheaper per unit than many battery LED markers and compares favorably to reflective tape priced about $0.50 to $3 per meter. The system delivers practical benefits such as fast marking, easy carrying, and simple testing in the field, yet requires ensuring team members carry UV lights for consistent, reliable use.
How much visibility improvement can you expect under a 365 nm UV torch
A 365 nm UV torch typically provides an estimated 2x to 5x increase in visible contrast for yellow highlighter marks versus unaided sight in low light, with effective detection commonly between 5 and 30 meters depending on torch power and ambient light. Stronger lamps, clean ink, and dark ambient conditions improve results, while weak UV output or early dusk light reduce the effect. Field testing and careful review help teams quantify real-world improvement for their specific routes and gear.
What are the risks and limitations of yellow highlighters for outdoor trails
Yellow highlighters cannot be seen without a UV light and are not a durable substitute for official trail signs, which limits their use to temporary or emergency situations. Ink fades in rain, wind, strong sunlight, or heavy dust and marks can be rubbed, washed away, or tampered with, so long-term reliability is low and legal liability remains with official signage systems. Users must plan for limited lifespan, carry backups, and treat highlighter marks as temporary aids that help direction finding but do not replace reflective or electronic wayfinding tools.
When does fluorescence fail and what weather affects visibility most
Fluorescence fails in direct sunlight, heavy rain, dense fog, and when marks are wet or covered by dust, and in these conditions visible contrast can drop sharply beyond a few meters. Wind that throws dust or leaves onto marks and bright ambient light from towns or vehicle headlights will reduce success rates compared to dark rural locations. Teams should test marker performance in local weather, log results, and plan alternatives for rainy or windy days to ensure operational reliability.
Who should consider using yellow highlighter UV trail markers for safety
Hikers, backpackers, search and rescue volunteers, outdoor educators, trail runners, and emergency preparedness groups should consider yellow highlighter UV markers for short-term dusk navigation when carrying UV torches and when permanent marking is not allowed. Predicament Measures provides guidance and review to help users compare options, perform simple field testing, and decide if highlighter markers meet their needs in 2025 and beyond. Groups must weigh cost, testing results, and the limited durability of these marks before relying on them for critical operations.
Are they appropriate for hikers search teams or solo night walkers
They are appropriate for organized groups and search teams that carry UV torches and who practice marker use, because team testing and shared gear improve reliability and efficiency. They are less appropriate for solo night walkers who do not carry a UV light or for legal trail marking where durable, tamper-resistant signage is required. Users should test supplies, train to use markers, and use highlighters as a helpful, low-cost supplement rather than a sole navigation system.
When is the best time to use yellow highlighter trail markers at dusk
The best time to use yellow highlighter trail markers is during civil twilight and early night when ambient light is low enough that fluorescent yellow under a 365 nm UV torch provides clear contrast, typically from about 10 minutes after sunset to full dark depending on weather and terrain. Field testing and user experience show detectable visibility about 5 to 30 meters with a 365 nm UV torch rated 1 mW to 500 mW, with rough detection success ranging from 50 to 90 depending on torch power and ambient light. Predicament Measures recommends testing markers on your planned route in 10 to 30 minute trial runs to confirm reliability, because highlighters cannot be seen without a UV light and visibility drops in rain, strong moonlight, or dusty conditions.
How long after sunset and under what light levels do they remain visible
Yellow highlighter marks remain visible under a 365 nm UV torch starting about 10 minutes after sunset in clear conditions and can remain usable into full night; visibility drops as ambient light rises above roughly 20 to 50 lux. Practical testing and reviews show contrast increases about 2x to 5x under UV compared to unaided eye in low light, with effective range tied to torch wattage and lens; marks become unreliable beyond about 30 meters. Users must note that highlighter markings cannot substitute for official signs and will not work in daylight without a UV source.
How much do yellow highlighters and UV torches cost versus reflectors
Yellow highlighters typically cost $0.50 to $2 each and 365 nm UV pen torches cost about $10 to $60, while reflective tape runs about $0.50 to $3 per meter, so upfront material cost for a basic UV marker kit is low but includes the torch. Cost comparison and reviews show a single highlighter plus a $20 UV torch can provide a low-cost marking method, while reflective tape for the same linear distance may cost substantially more depending on tape quality; durable LED markers cost $15 to $50 each. Predicament Measures highlights that cost alone does not equal reliability, because highlighters are less durable than reflectors and cannot handle wet or abrasive conditions as well as tape or sealed LED markers.
What is the cost per 100 meters for highlighters reflective tape and glow sticks
Estimated cost per 100 meters using yellow highlighters depends on placement density and ink use and ranges roughly $0.50 to $6 for consumable highlighters, assuming 1 to 3 highlighters at $0.50 to $2 each and a single UV torch amortized separately. Reflective tape at $0.50 to $3 per meter costs about $50 to $300 for 100 meters, and this provides durable, passive visibility without a UV torch. Glow stick costs vary by brand and duration; using common spacing of 5 to 20 meters and typical retail pricing, users should expect a wide range for 100 meters and must check current local prices and durations to get an exact cost estimate.
What materials and tools are needed to create UV highlighter trail markers
You need fluorescent yellow highlighters, a 365 nm UV torch, a method to place marks (zip ties, flagging tape, or small adhesive patches), and basic testing gear like a timer and a meter to measure spacing; bring spare markers and batteries. Equipment testing and field experience suggest using 0.5 to 1 cm wide marks on trees or rock with spacing of 5 to 20 meters depending on route complexity, and carrying at least one spare UV torch battery set for 2 to 6 hours of intermittent use. Predicament Measures advises practice testing on sample surfaces before field deployment to ensure reliability, because not all surfaces accept highlighter dye and marks will fade faster in rain or on porous bark.
What power and wavelength UV torch and marker sizes deliver reliable results
A 365 nm UV torch is essential because this wavelength excites standard yellow highlighter dyes; practical power ranges that deliver reliable results run from about 1 mW for very close work up to 300 mW or more for extended 20 to 30 meter detection in low ambient light. Marker tip sizes between 2 mm chisel tips and 5 mm bullet tips work well for visible marks; larger marks help detection and speed but use more ink and can reduce durability. Users should test a 365 nm torch and their chosen highlighter on local surfaces to verify performance and plan for replacement, because lower wavelengths and cheap blacklight LEDs deliver weaker excitation and poorer results.
What are the best alternatives to yellow highlighter UV trail marking for dusk
Best alternatives include reflective tape, battery-powered LED markers, and chemical glow sticks, each offering different reliability, durability, and cost trade-offs compared in practical tests and reviews. Reflective tape provides passive visibility to standard headlamps and vehicle lights and lasts months to years, LED markers give active multi-hour signaling and ruggedness, and glow sticks give single-use light without batteries and work in all light conditions but have finite burn time. Predicament Measures recommends choosing alternatives based on specific needs such as long-term durability, weather resistance, and whether you can carry an active power source, because yellow highlighters only assist when you carry a UV torch.
How do reflective tape LED markers and glow sticks compare in visibility
Reflective tape performs best for passive visibility to standard lights at ranges often beyond 30 meters and provides consistent reliability in rain and daylight; LED markers deliver bright active light visible from 50 meters or more depending on lumen output and beam design. Glow sticks provide consistent 4 to 12 hour light depending on type and are visible in full darkness without a UV torch but lose intensity over time and are single use. Field reviews and testing data show reflective tape and LED markers generally outperform yellow highlighter marks for long-term wayfinding, while highlighters remain useful as low-cost, low-weight backups for trained users who carry a 365 nm torch.
What common mistakes should be avoided when using yellow highlighters for trails
Common mistakes include relying on highlighters without carrying a compatible 365 nm UV torch, placing marks in direct sunlight, and making marks too small or too sparse to be seen reliably; these errors reduce reliability and can cause navigation errors. User experience and testing show success falls sharply in rain, dusty conditions, and on porous surfaces that absorb dye, so always test marks on expected surfaces and carry backups like reflective tape or LED markers. Predicament Measures stresses that highlighters cannot replace official signage or legal markers and that teams must rehearse marking and recovery to ensure safety and consistent results.
How often should markers be placed and how to avoid common errors
Place markers every 5 to 20 meters for complex or confusing terrain and every 10 to 30 meters on straightforward sections, and verify spacing during a short test walk that takes 10 to 30 minutes per 100 meters. To avoid common errors use larger marks 1 to 3 cm wide, mark on stable surfaces above likely flood or snow lines, document marker placement with GPS waypoints, and carry spare highlighters and batteries. Field testing, reviews, and training exercises improve marking skills and help ensure reliability, because poor placement and lack of testing reduce success and increase rescue time.
Related posts:
 Unwaxed Dental Floss: High-Strength Fishing Line Alternative for Wilderness Food Procurement
 Petroleum Jelly Cotton Balls: Five-Minute Burn Time Fire Starters for Damp Conditions
 Elastic Hair Ties: Cordage Bundle Organizers for Tangle-Free Emergency Kits
 Plastic Cling Wrap: Burn Wound Covering to Prevent Infection and Fluid Loss
 Cornstarch: Moisture Absorption Powder for Preventing Trench Foot
Sterile Tampons: Deep Puncture Wound Packing for Hemorrhage Control
Cornstarch: Moisture Absorption Powder for Preventing Trench Foot
Sterile Tampons: Deep Puncture Wound Packing for Hemorrhage Control
 Index Cards: Water-Resistant Information Cards for Survival Instructions