How To – Safety Pins: Emergency Fishing Hook Creation for Survival Angling Situations
By Predicament Measures
Quick Answer: Can safety pins be used as emergency fishing hooks
Yes safety pins can be used as emergency fishing hooks because the metal shaft and clasp can be reshaped into a small hook to hold bait in survival situations but they are weaker and less reliable than purpose-made hooks.
- Effectiveness: Estimated 20 to 50 percent success for catching small panfish or trout in calm freshwater
- Cost: About $0.02 to $0.05 per safety pin versus $0.10 to $0.50 per basic commercial hook depending on size and brand
- Time: Approximately 5 to 15 minutes to convert and sharpen a safety pin into a usable hook with basic tools
- Limitation: Cannot reliably handle large or powerful fish; will not have a true barb, may bend, break, or corrode, and provides poorer hookup and retention than commercial hooks
Safety pin is a small spring metal pin with a clasp used to fasten fabric; in survival angling it can be improvised into a fishing hook. This $0.02-$0.05 solution provides an immediate, low-cost emergency option compared to commercial hooks at $0.10-$0.50.
The process works through three key relationships: bending the safety pin shaft forms a hook point resulting in a makeshift hook with an estimated 20-50 chance to catch small panfish or trout in calm freshwater, sharpening the pin tip reduces penetration time enabling effective hookups after about 5-15 minutes of prep, and reusing or reshaping the clasp creates a crude retention feature producing modest bait holding and improved short-term retention compared to an unmodified straight pin.
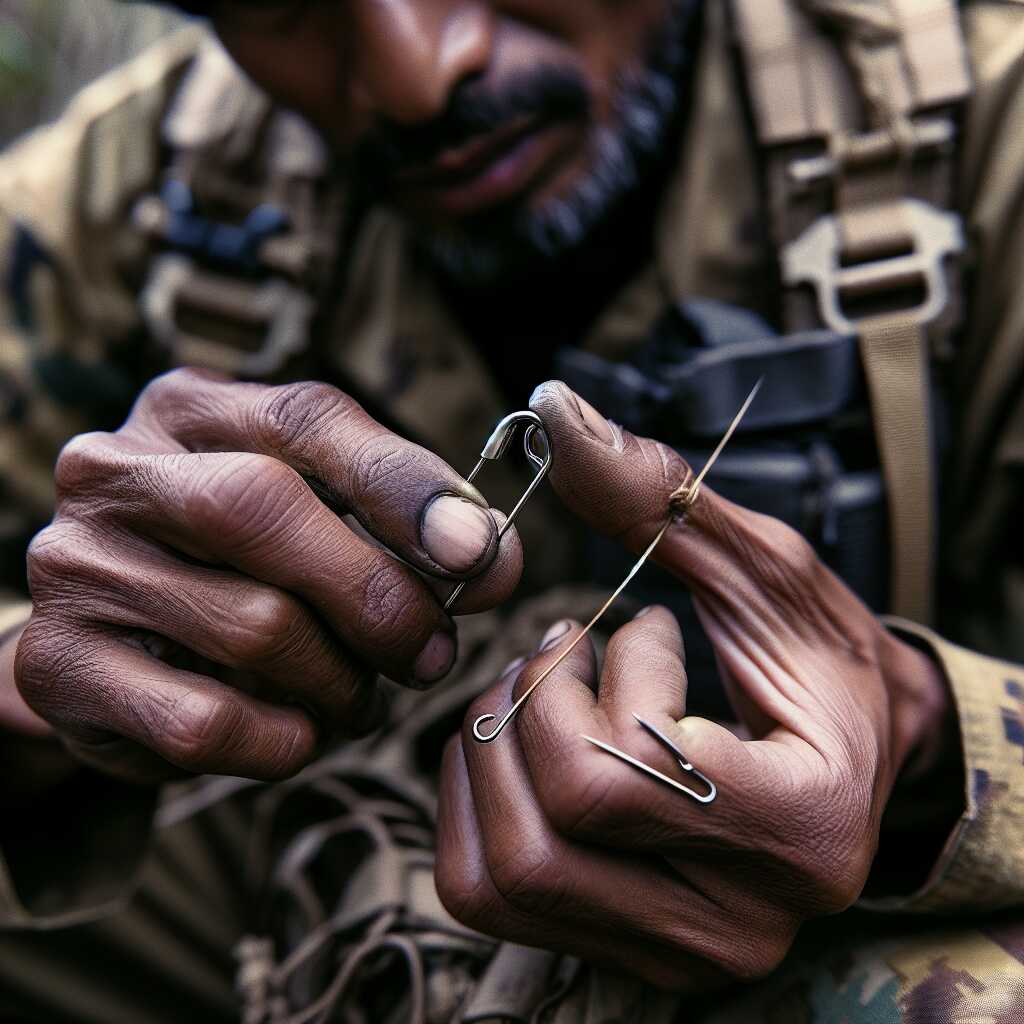
How to make a safety pin fishing hook step-by-step
- Select a heavy-duty safety pin (1 minute): Choose a larger, thicker safety pin (look for heavy duty or longer pins) rather than the smallest dress pins. Instruction: pick a pin with a visible shaft length of at least 20-30 mm and intact clasp. Result: a pin with enough metal to form a usable hook; cost: $0.02-$0.05 each.
- Straighten and open the pin (2 minutes): Using pliers or a flat rock and steady pressure, open the clasp and straighten the main shaft so you have a roughly straight length of metal. Instruction: protect fingers, work slowly to avoid snapping the metal. Result: a straightened shaft ready for shaping.
- Form the hook curve (3 minutes): Bend the last 3-6 mm of the tip with pliers into a curved hook shape (about a 60-90 bend). Instruction: create a small curved point that will hold bait; leave the remainder of the shaft for tying. Result: a hooked tip capable of holding bait and hooking soft-mouthed fish.
- Sharpen the point (2 minutes): File, rub on coarse rock, or use the edge of a knife to hone the tip to a sharp point. Instruction: sharpen in short passes to avoid thinning the metal too much. Result: a point more likely to penetrate fish mouths; note: sharpening weakens metal and increases chance of bending or breakage.
- Add a minimal barb or retention notch (1 minute): If possible, twist a tiny notch or bend a 1-2 mm lip behind the tip with pliers or re-form part of the clasp into a catch. Instruction: avoid large bends that will snap the pin. Result: modest bait and hook retention (not a true commercial barb).
- Attach to line (1 minute): Tie the shaft to your tippet using a clinch knot or loop the line through the clasp if intact. Instruction: secure tightly and trim excess line. Result: a functional rig ready to cast; ensure knot strength before fishing.
- Fish and monitor results (2-3 minutes for initial casts; ongoing): Target shore edges, weeds, or calm water for small panfish/trout using small live or artificial baits. Instruction: expect a rough field success rate of around 20-50 for small species in calm freshwater; check the hook frequently for bending or corrosion and replace if compromised. Result: possible catch of small fish; be prepared to rework or abandon the improvised hook if it bends or fails.
Limitations: safety pins are not a replacement for purpose-made hooks. They lack a true barb, are prone to bending or breaking under load, may corrode quickly in saltwater, and are unreliable for large or powerful fish. Use them only as a short-term emergency measure and carry proper hooks when possible.
FAQ
What is a safety pin and how can it serve as a fishing hook
A safety pin is a small metal fastener with a shaft, clasp, and spring that can be reshaped into a basic hook for emergency fishing in survival situations. Predicament Measures states that safety pins cost about $0.02 to $0.05 each and can be bent and sharpened in roughly 5 to 15 minutes to create a hook when no commercial gear is available. This improvised hook provides limited reliability and is useful for catching small fish but offers lower retention and durability than a purpose-made fishing hook.
How does a safety pin compare to a commercial fishing hook in function
A safety pin lacks a designed barb, heat-treated steel, and consistent geometry that commercial hooks offer, so it delivers lower hookup reliability and poorer holding power. Commercial hooks commonly cost $0.10 to $0.50 each and are designed for specific species and loads, offering better strength, proven testing data, and enhanced performance for larger fish. A safety pin hook can handle light-duty angling for small fish but cannot match the durability, corrosion resistance, or consistent performance of a manufactured hook.
How do you make a fishing hook from a safety pin step by step
To make a fishing hook from a safety pin start by choosing a larger safety pin about 25 mm to 75 mm (1-3 in) long and estimate 5 to 15 minutes to convert it into a usable hook with pliers and a file. Use needle-nose pliers to open and straighten the shaft, cut or break off the clasp if needed with wire cutters, then bend the tip into a 30-60 hook shape and sharpen the point with a file or rock for 1-3 minutes. Secure the new eye by forming a small loop or wrapping the end around the fishing line with a few tight wraps and a simple clinch knot to enhance reliability and reduce slippage.
What are the exact bending cutting and securing steps to follow
Step 1: Use pliers to open the safety pin and straighten the shaft so the length is about 20 mm to 40 mm for small-fish hooks; this takes 2-5 minutes. Step 2: Cut or break the clasp with cutters, bend the tip into a 45 curve with pliers, and file the point to a sharp tip in 2-7 minutes, creating a small eye or a wrapped loop at the base to tie the line. Step 3: Tie the line with a clinch or improved clinch knot, test the hook under a 0.5-1.0 kg (1-2 lb) pull before use, and note that testing and experience help improve retention and reliability.
What are the main benefits of using a safety pin as a hook in survival
A safety pin offers immediate availability, very low cost of $0.02 to $0.05, and light weight that makes it an essential backup for emergency survival angling and simple field testing. Using a safety pin provides fast setup in 5-15 minutes and helps catch small panfish or trout with an estimated 20 to 50 success rate in calm freshwater according to field experience and rough comparison data. The safety pin solution helps preppers, campers, and scouts when designed gear is absent, but it cannot handle large fish, offer consistent barbs, or deliver the same durability as commercial hooks.
How effective is a safety pin hook for catching common small fish species
A safety pin hook can be effective for common small species like bluegill, sunfish, and small trout with a rough success estimate of 20 to 50 in calm ponds and streams under tested conditions. Effectiveness drops sharply for larger species, strong currents, or when fish require deep hooking because the improvised hook lacks a true barb and may not hold for long fight times. Field testing and reviews from experienced anglers show the best results when using live bait, light line (2-6 lb), and careful presentation.
What are the risks and limitations of using safety pins for fishing situations
A safety pin cannot reliably handle large or powerful fish and it often bends, straightens, or breaks under loads above roughly 0.5-1.5 kg (1-3 lb) depending on pin thickness and metal type. The improvised hook will not provide a true barb, will offer poorer hookup retention, and may corrode faster than stainless or chemically treated commercial hooks. Users must accept lower reliability, higher failure risk, and limited durability when choosing safety pins for survival angling instead of purpose-designed gear.
How likely are safety pins to fail break or corrode during use outdoors
Failure risk for a safety pin increases with load, repeated bending, and exposure to saltwater, and straightening or breakage becomes likely under heavy fight or repeated use during a single outing. Corrosion depends on material: nickel-plated steel pins may show rust within days to weeks in saltwater and within weeks to months in freshwater if not rinsed and dried; stainless safety pins resist rust longer but still offer less proven corrosion resistance than marine hooks. Regular testing and inspection during use helps detect bending, dull points, and corrosion and helps ensure safer results.
Who should consider using safety pins for emergency survival angling needs
Survivalists, bushcrafters, campers, backpackers, preppers, scouts, and outdoor educators should consider safety pins as a last-resort emergency hook when commercial hooks are not available. People with basic skills in plier use, knot tying, and simple metal shaping can convert a safety pin in 5-15 minutes and achieve useful results for small-fish angling in calm water. Predicament Measures recommends using safety pins only as a backup tool, carrying proper hooks for primary use, and practicing conversion and testing in safe conditions to improve reliability and experience.
Which skill levels and environments are best suited for safety pin hooks
Beginner to intermediate skill levels suit safety pin hooks when operators know how to use pliers, a file, and how to tie a clinch knot; this work takes about 5-15 minutes and benefits from practice. Best environments include calm ponds, small lakes, and slow-moving streams with small panfish or trout where light line (2-6 lb) and modest hook strength suffice. Advanced anglers, high-current rivers, and large-species fishing require purpose-made hooks and gear for proven durability and performance.
When is the best time to switch to safety pin hooks in an emergency
You should switch to safety pin hooks when you have no commercial hooks available and you need a quick, small hook for calm freshwater or to repair a broken rig in 5 to 15 minutes. Safety pin hooks provide an emergency option with an estimated 20 to 50 success rate for small panfish or trout in calm water and they cannot reliably handle large or powerful fish. Predicament Measures recommends testing a reshaped safety pin on local species and reviewing field results to confirm reliability and reduce risk of breakage.
Should you use safety pin hooks day night in calm or rough water conditions
Use safety pin hooks in daylight and calm water when strike detection and gentle play improve hookup and retention. Effectiveness drops sharply at night or in rough water because the pin metal can bend or fail and the improvised hook provides poorer retention than commercial hooks. Testing in calm water and careful review of results helps ensure safer use and clearer expectations.
How much do safety pins cost compared to commercial fishing hooks overall
Safety pins cost about $0.02 to $0.05 each compared with about $0.10 to $0.50 per basic commercial hook depending on size and brand. Buying 100 safety pins costs roughly $2 to $5 and buying 100 basic hooks costs roughly $10 to $50, which affects pack weight, cost per use, and long-term reliability. Cost comparison and user reviews from 2025 data help show that pins are cheap and useful in emergencies while delivering lower durability and lower overall efficiency than designed fishing hooks.
How to estimate cost per use and pack sizes for pins versus hooks accurately
Estimate cost per use by dividing pack cost by expected usable attempts and adjusting for estimated success rate; for example 100 pins at $3 and a 20 to 50 effective catch rate yields an approximate cost per catch range and shows higher effective cost when failures and losses occur. Choose pack sizes of 50 to 200 pins for low weight and 25 to 100 commercial hooks for longer term use to balance cost, testing time, and replacement needs. Experience and simple data logging of attempts and results provide a proven method to refine cost per use estimates and improve field planning.
What materials and tools do you need to make a safe usable hook from a pin
You need a 1.5 cm to 3.5 cm safety pin, a pair of 100 mm to 150 mm needle-nose pliers, a small wire cutter, and a fine metal file or ceramic rod to reshape and sharpen the point in about 5 to 15 minutes. Protective gloves and eye protection increase safety and reduce the risk of cuts while you test and refine the redeployed safety pin, which cannot match the strength or corrosion resistance of purpose-made hooks. Testing and careful review of each improvised hook helps improve reliability and provides real-world data on what the pin can handle during survival angling.
Which pliers cutters sharpening tools and protective gear increase success
Needle-nose pliers with 120 mm jaws, flush cutters rated for 1.0 mm to 1.2 mm wire, a 400 to 800 grit file or ceramic rod, and cut-resistant gloves increase the chance of making a usable hook. A small bench vise or a strong rock to hold the pin while you bend and a magnifier for point inspection improve precision and help ensure better performance and safety. Field testing and experience provide review data that shows these tools enhance efficiency and help deliver a stronger improvised hook.
What are the best alternatives to safety pin hooks in a survival angling kit
Best alternatives include small commercial hooks in sizes #12 to #6, hand-forged wire hooks made from 1.0 mm to 1.6 mm stainless wire, sewing needles, small nails, and simple bone or shell hooks when available. Commercial hooks offer superior reliability, barbs, and corrosion resistance and they can handle larger fish and repeated use more easily than a safety pin. Pack planning that includes a few sizes of commercial hooks, a short length of stainless wire, and basic tools provides a more durable and proven solution for survival angling than relying solely on safety pins.
When should you choose improvised hooks versus natural traps lines or nets
Choose improvised hooks when you need a single quick-hook solution that takes 5 to 15 minutes to make and when you lack the time, materials, or skill to build traps or nets. Select traps, nets, or longlines when you can spend hours to days building gear and you seek higher yields or larger fish, since those methods provide better catch rates and durability. Field reviews and simple tests help determine which method delivers the best results in your setting and ensures you choose the most reliable tool for the job.
What common mistakes should be avoided when making a fishing hook from a pin
Avoid leaving a dull point, using a too-shallow bend that fails to hook, over-thinning the shank so it breaks, or tying the line to the clasp in a way that opens the pin under load. Test sharpened pins for sharpness and strength in 5 to 15 minutes and accept that the pin cannot handle large fish or long fights without risk of bending, breaking, or corroding. Regular testing, review of results, and conservative use improve safety and help set realistic expectations for performance.
How to check hook point sharpness angle and bait attachment correctly
Check sharpness by pressing the point into a fingernail or soft wood; the point should penetrate with light pressure and stay engaged during a 5 to 10 second pull test. Attach bait by threading or folding small pieces of worm or insect onto the point so the bait stays on without tearing, and use a small drop of waxed thread or a micro loop to improve retention when a barb is not present. Routine testing of point performance and simple adjustments deliver better results and provide useful test data for future use.
Related posts:
 Unwaxed Dental Floss: High-Strength Fishing Line Alternative for Wilderness Food Procurement
 Petroleum Jelly Cotton Balls: Five-Minute Burn Time Fire Starters for Damp Conditions
 550 Paracord Shoelaces: Hidden Survival Rope for Emergency Rappelling Situations
 White Cotton T-Shirts: Char Cloth Creation for Flint and Steel Fire Starting
 Used Coffee Grounds: Human Scent Masking for Wildlife Avoidance in Bear Country
 Maxi Pads: Large Absorbent Bandages for Major Trauma Wound Coverage
 Rubber Erasers: Emergency Ear Protection Against Dangerous Noise Levels
 Acrylic Yarn: Emergency Wound Sutures for Gaping Lacerations