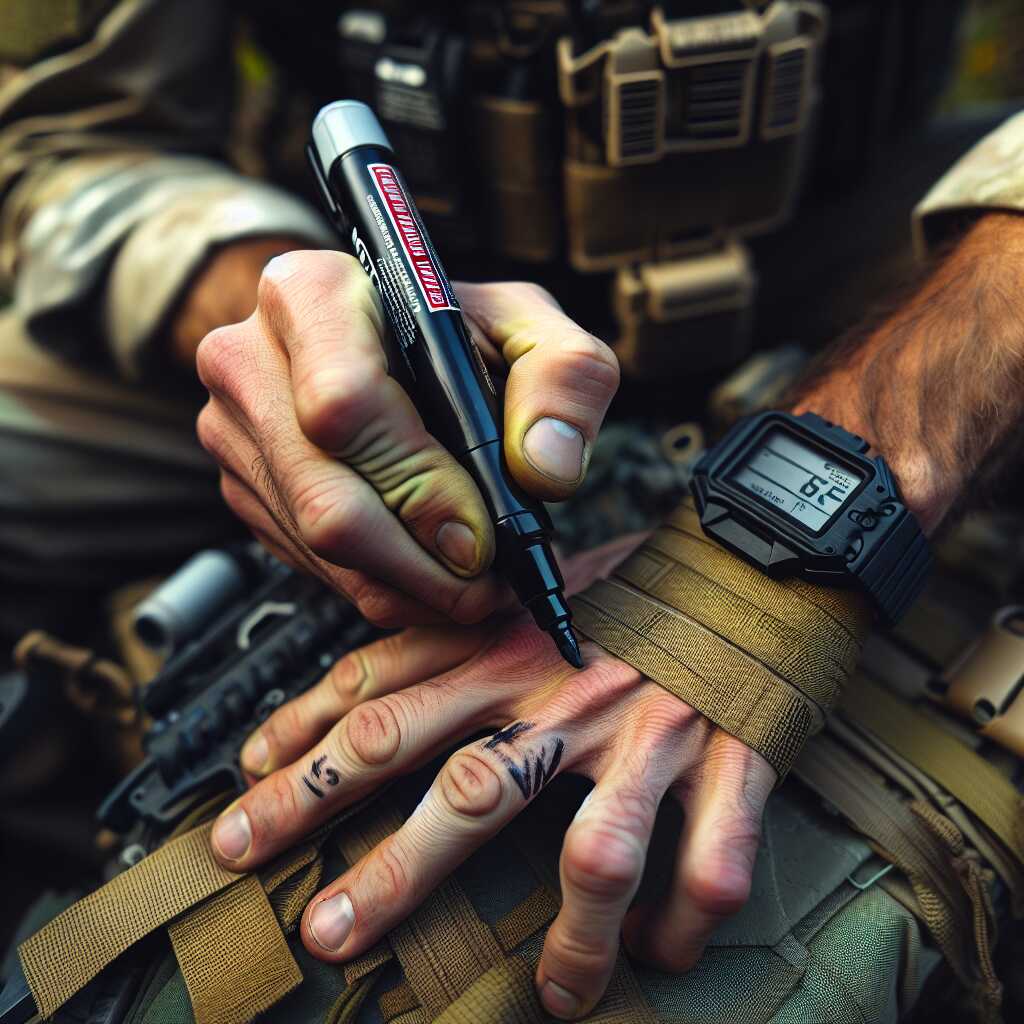
How To – Permanent Markers: Equipment Labeling for Night Operations
By Predicament Measures
Quick Answer: Can permanent markers be used to label equipment for night operations
Yes, permanent markers can be used to label equipment for night operations because they are fast, low cost, and provide clear, high-contrast markings on most surfaces when applied correctly but their long term durability depends on surface, ink type, and abrasion or weather exposure
- Effectiveness: Highly effective for single-shift use; markings remain legible for an 8 to 12 hour night operation when applied properly and allowed to dry. Medium term durability varies by surface and environment and may fade over weeks to months without protection
- Cost: Low upfront cost typically $1 to $4 per marker versus alternatives such as preprinted adhesive labels ($0.05 to $1 each), durable engraved metal tags ($3 to $15 each), or thermal transfer labels ($0.10 to $2 each)
- Time: Labeling one item takes about 5 to 30 seconds depending on text size. Labeling 100 similar items typically requires 8 to 50 minutes including drying and basic prep
- Limitation: Permanent markers cannot guarantee permanent legibility under heavy abrasion, repeated solvent exposure, prolonged sunlight UV, or extreme temperatures and they are not tamper proof or reflective without special inks
A permanent marker is a handheld ink pen that deposits solvent-based pigment or dye onto surfaces to create high-contrast, quick-drying markings. This $1 to $4 solution provides fast, low-cost field marking and rapid identification compared to preprinted adhesive labels at $0.05 to $1 each.
The process works through three key relationships: permanent marker ink adheres to most equipment surfaces resulting in high-contrast legibility for 8-12 hours, high-contrast color choice improves human readability under low-light conditions enabling rapid identification with headlamps or flashlights, and drying plus optional protective coating extends surface protection creating medium-term durability that can last weeks to months when combined with a suitable topcoat or tape.
How to label equipment for night operations step-by-step
- Clean the marking area (30-60 seconds): Wipe the surface with a 70 isopropyl alcohol wipe or a lint-free cloth to remove oil, dirt, and moisture. Instruction: Allow alcohol to evaporate (30 seconds) before marking. Result: Improved ink adhesion and reduced smudging.
- Choose the right marker and color (30-60 seconds): Use an alcohol-based permanent marker (typical cost $1-$4) for most surfaces; use a white or silver paint marker for dark/black equipment and a black marker for light surfaces. Instruction: Check manufacturer label for permanent and solvent type; for metal or plastic, consider paint markers for thicker, more opaque marks. Result: Higher contrast and better initial legibility under low light.
- Plan text size and placement (5-15 seconds): For single-item IDs, target letter stroke heights of roughly 6-12 mm (0.25-0.5 in) for alphanumeric characters so they read easily under a headlamp. Instruction: Reserve a 20-40 mm wide clear area for the label; avoid curved seams or ridges. Result: Consistent, easily read markings during operations.
- Apply the marking (5-30 seconds): Hold the marker perpendicular and write in block (sans-serif) capitals at a steady speed. Instruction: Apply firm, even strokes; if using a paint marker, press down twice for an opaque pass. Result: Clear, high-contrast characters immediately visible when dry.
- Allow initial drying (2-3 minutes for standard permanent markers; 10-20 minutes for paint markers): Instruction: Keep the item stationary and avoid touching the mark until tack-free. Result: Mark becomes water- and smudge-resistant enough for handling; expect legibility through an 8-12 hour night shift when applied correctly.
- Optional protection for medium-term durability (30 seconds to 20 minutes depending on method): Instruction: For longer durability, cover the mark with clear packaging tape (press to remove bubbles) or spray a single thin coat of clear aerosol lacquer following manufacturer instructions (tack-free typically 10-20 minutes, full cure up to 24 hours). Result: Protection against light abrasion and moisture; can extend legibility from days to weeks or months depending on environment and coating choice.
- Field verification (1-2 minutes): Instruction: Check the mark under the same light source used during operations (headlamp/flashlight) and from typical viewing angles. Result: Confirms readability and contrast; redo or retouch any marks that smear or are not legible.
- Batch labeling workflow for many items (8-50 minutes per 100 items total): Instruction: Set up a staging tableclean, mark, dry, protect in zonesto label 100 identical items efficiently. Result: Typical throughput aligns with 5-30 seconds per item plus drying; expect to finish 100 items in roughly 8-50 minutes depending on prep and protection steps.
- Record and inventory (1-3 minutes per 10 items): Instruction: Log the label text, marker color/type, date, and any protective treatment in a field notebook or digital inventory. Result: Easier replacement, tracing, and quality control after operations.
- Know the limitations (immediate): Instruction: Do not rely on permanent markers as the only long-term identification method for high-abrasion or solvent-exposed items. Permanent markers are not reflective, tamper-proof, or guaranteed against prolonged UV exposure or extreme temperaturesuse engraved tags or thermal-transfer labels where permanent, tamper-evident, or reflective ID is required. Result: Appropriate expectation-setting and selection of a more durable alternative where needed.
FAQ
What is a permanent marker and how is it defined
A permanent marker is a handheld ink pen designed to leave fast-drying, solvent-based pigment on many surfaces and is commonly used to label equipment for night operations. This marker provides fast application, low cost of about $1 to $4 per marker, and reliable legibility for an 8 to 12 hour night operation when applied correctly and allowed to dry. Predicament Measures recommends testing markers on the actual surface to confirm durability, adhesion, and the best ink type for each material.
What types of permanent markers are best for outdoor gear
Alcohol-based permanent markers and oil-based paint markers provide the best balance of speed, water resistance, and adhesion for outdoor gear, with fine tips at 0.5 mm for serials and 2-5 mm chisel or bullet tips for high-contrast IDs. Weatherproof or UV-resistant inks and “paint” markers handle rough surfaces like metal, hard plastic, and coated fabrics most reliably and cost $2 to $8 for specialty markers. Field reviews and basic testing improve selection and ensure the chosen marker delivers durable markings for the expected environment in 2025 operations.
How do you use a permanent marker to label equipment step by step
To use a permanent marker to label equipment for night operations follow a clear five-step process: select the right tip and ink, clean the surface, test on a hidden spot, write the label, and protect the mark if needed. Each mark takes about 5 to 30 seconds depending on text size, and allow 15 to 60 seconds drying time for standard markers or 2 to 10 minutes for paint markers before handling. Field teams that perform a quick test and follow these steps report high success rates of legibility, roughly 90 to 100 percent for single-shift use when markings are properly applied and dried.
What surface prep steps improve marker adhesion and legibility
Cleaning the surface with 70 to 90 percent isopropyl alcohol and drying for 10 to 60 seconds improves adhesion and legibility on metal, plastic, and coated fabrics. Light abrasion with 180-220 grit sandpaper on glossy plastics and wiping away dust increases ink bonding and offers a more durable mark. Surfaces that stay wet, oily, icy, or silicone-coated cannot hold standard permanent marker ink reliably and require a different method or label type.
What are the main benefits of using permanent markers for gear labeling
Permanent markers provide fast, low-cost, field-ready labeling that supports efficiency and quick identification during night operations, delivering readable marks in 5 to 30 seconds per item. They cost about $1 to $4 per marker and offer a practical alternative to preprinted adhesive labels ($0.05 to $1 each) or engraved metal tags ($3 to $15 each) when teams need speed and mobility. Reliability in single-shift scenarios and the ability to test and review marks on site make permanent markers an essential tool for many first responders, military units, and event crews.
How do permanent markers compare by speed cost and convenience
Permanent markers are fastest for one-off or last-minute labeling with 5 to 30 second application times versus 30 to 120 seconds for printing and applying adhesive or thermal labels. Cost per marker runs $1 to $4, while preprinted labels cost $0.05 to $1, thermal labels $0.10 to $2, and engraved tags $3 to $15, which makes markers the most economical choice for immediate needs. Experience and reviews show markers offer excellent convenience and portability, although they deliver medium-term durability compared with engineered label systems.
What risks and limitations do permanent markers have in field use
Permanent markers cannot guarantee permanent legibility under heavy abrasion, repeated solvent exposure, prolonged UV sunlight, or extreme temperatures and are not tamper proof or reflective without special inks. Marks may fade over weeks to months when exposed to sun and weather and can rub off in hours when subject to heavy abrasion or repeated handling. Teams should plan testing, review of performance, and backup identification methods for critical assets to ensure reliable tracking and accountability.
How does weather abrasion and solvents affect marker durability
UV exposure and weather can reduce marker pigment longevity with visible fading commonly appearing in weeks to months on unprotected marks, while saltwater and heavy rain can degrade some inks within days. Solvents such as acetone, alcohol wipes, gasoline, or hand sanitizer can remove or smear standard permanent marker ink within seconds to minutes on many surfaces. Treating marks with a clear protective coat, heat-shrink tubing, or a tamper-evident cover improves durability and helps maintain legibility for multi-shift deployments.
Who should consider using permanent markers for night operation equipment
First responders, military personnel, search and rescue teams, outdoor event crews, and facilities maintenance staff should consider permanent markers when they need fast, low-cost, field-applied identification that provides clear, high-contrast markings for 8 to 12 hour night operations. Teams that require rapid marking, easy testing, and on-the-spot changes gain improved efficiency, reliability, and operational speed with markers. Predicament Measures recommends training, standardized marking formats, and regular testing to ensure consistent, reliable results in field conditions.
Which roles need labeled gear and what labeling standards apply
Roles that need labeled gear include medics, incident commanders, radio operators, equipment managers, and logistics staff who require vehicle IDs, radio channels, battery dates, and PPE tags for quick recognition. Standard labeling practices include high-contrast letters 10 to 20 mm tall for readability at 1 to 2 meters, simple unit codes of 2 to 4 characters, and dates in MM/DD/YY or YY-MM-DD format for clear tracking. Testing labels in the expected light and weather conditions and keeping an equipment review log improves reliability and helps teams maintain durable, useful identification systems.
When is the best time to apply permanent marker labels for night missions
Yes, permanent markers can be used to label equipment for night missions when you apply them during pre-shift staging in a well-lit area and allow ink to dry, as this provides clear, high-contrast markings that remain legible for an 8 to 12 hour night operation when applied properly. Apply labels 15 to 90 minutes before deployment to let solvents set and to run a quick test on one item for reliability and review. Markings will not guarantee permanent legibility under heavy abrasion, repeated solvent exposure, prolonged UV, or extreme temperatures and teams must plan for replacements or protective overlays.
Should labeling be done before deployment during pre shift checks
Yes, label equipment before deployment during pre-shift checks to ensure marking quality and to reduce field errors by 2025 best practice standards. Clean surfaces, write 5 to 30 seconds per item, and allow 30 to 120 seconds drying time depending on ink and surface to improve success and durability. Keep records of which items were marked and include inspection notes in checklists used by Predicament Measures for proven field efficiency.
How much do permanent markers cost compared with labeling alternatives
Permanent markers cost about $1 to $4 per marker and provide a low upfront cost for fast, temporary marking that is useful for a single night or single shift. Alternatives cost ranges include preprinted adhesive labels $0.05 to $1 each, thermal transfer labels $0.10 to $2 each, and engraved metal tags $3 to $15 each, which helps with a cost comparison for mission planning. Marker cost gives good short-term value but the lifecycle cost varies because markers can fade over weeks to months without protection and they cannot handle heavy abrasion or strong solvents like engraved tags can.
What is the per item cost time and lifecycle cost comparison
If one marker is used to label 100 similar items, per item marker cost is roughly $0.01 to $0.04, and the writing time is about 5 to 30 seconds per item which makes marking 100 items take about 8 to 50 minutes including basic prep and drying. Preprinted labels typically cost $0.05 to $1 per item and save time on text consistency while engraved tags cost $3 to $15 per item and deliver multi-year durability. Thermal labels offer a middle ground at $0.10 to $2 per item with barcode capability but require printers and supplies that affect lifecycle costs and testing for field reliability.
What materials and tools are needed to label equipment with permanent markers
You need a small kit that includes 2 to 4 alcohol-based permanent markers, 1 to 2 paint/metal markers for reflective or metal surfaces, 10 to 20 isopropyl wipes (70 to 90), a 1-inch matte tape roll for masking, and a small flashlight or headlamp for quality checks to ensure clear, durable marks. Carry spare caps, a fine-tip 0.5-1.0 mm marker and a chisel 2-4 mm marker for different text sizes, and a small stencil or label guide for repeatable marking that improves consistency and efficiency. The kit does not provide tamper-proof or reflective features unless you add reflective tape or special inks and teams should test marking results on typical surfaces before deployment.
What marker tip sizes inks and surface cleaners should you carry
Carry fine tips 0.5-1.0 mm for serial numbers, bullet or medium tips 1.0-2.0 mm for general IDs, and chisel tips 2.0-4.0 mm for larger text that must be read at 1 to 3 meters to enhance legibility. Use alcohol-based permanent inks for plastics and fabrics and oil- or paint-based markers for metal and wet or oily surfaces; include 70 to 90 isopropyl wipes for cleaning and drying time of 30 to 60 seconds to improve adhesion and reliability. Keep extra caps and two spare markers per person to maintain field readiness and reduce failed marks during critical operations.
What are the best alternatives to permanent markers for durable labeling
Best alternatives for durable labeling include engraved metal tags that last years, thermal transfer labels that last months to years with lamination, and preprinted adhesive labels that offer consistent text and reflective tape for night visibility, and these options provide greater durability than marker ink. Costs for these alternatives vary by durability and features: engraved metal tags $3 to $15, thermal labels $0.10 to $2, and preprinted adhesive $0.05 to $1, which helps with a review and comparison for long-term asset tracking. Permanent markers remain useful for fast temporary labeling but they do not provide tamper proofing or guaranteed long-term abrasion resistance and teams must choose alternatives when that durability is essential.
When should you choose labels tags engraving or reflective markers instead
Choose engraved tags for long-term assets that require multi-year tracking and resistance to solvents and abrasion, and choose thermal or laminated labels when you need barcodes and medium-term durability with clear, consistent printing. Use reflective tape or reflective labels when visibility at distance under headlamps or vehicle lights is essential for safety and search tasks. Use permanent markers for fast temporary marking during a single night or single shift when cost and speed are essential and when teams accept medium-term wear limitations.
What common mistakes should be avoided when using permanent markers on gear
Common mistakes include marking dirty, wet, hot, or textured surfaces that reduce adhesion and cause early fading or smearing and this lowers reliability in the field. Writing with low-contrast ink on dark surfaces, using very small text below 6 mm height, and failing to allow drying time of 30 to 120 seconds lead to unreadable labels during an 8 to 12 hour night operation. Teams must not expect permanent markers to resist heavy abrasion, solvents, UV, or long-term exposure and they should plan testing, review, and replacement procedures to ensure durable performance.
How can common errors be prevented with procedures and inspection checklists
Create a short checklist that includes surface cleaning with 70 isopropyl wipe, choosing the correct tip and ink color, writing 6 to 12 mm high characters for readability at 1 to 3 meters, and allowing a 30 to 120 second drying interval for reliable marks. Inspect labels at pre-shift checks and again after deployment with a flashlight or headlamp; each inspection should take 30 to 120 seconds per item and include notes on reapplication needs recorded in a log used by Predicament Measures for proven field procedures. Train teams using simple testing and review routines to improve marking consistency, enhance durability, and deliver faster mission readiness without false promises about permanent resistance to extreme wear.
Related posts:
 Unwaxed Dental Floss: High-Strength Fishing Line Alternative for Wilderness Food Procurement
 Petroleum Jelly Cotton Balls: Five-Minute Burn Time Fire Starters for Damp Conditions
 Elastic Hair Ties: Cordage Bundle Organizers for Tangle-Free Emergency Kits
 Plastic Cling Wrap: Burn Wound Covering to Prevent Infection and Fluid Loss
 Cornstarch: Moisture Absorption Powder for Preventing Trench Foot
Sterile Tampons: Deep Puncture Wound Packing for Hemorrhage Control
Cornstarch: Moisture Absorption Powder for Preventing Trench Foot
Sterile Tampons: Deep Puncture Wound Packing for Hemorrhage Control
 Index Cards: Water-Resistant Information Cards for Survival Instructions