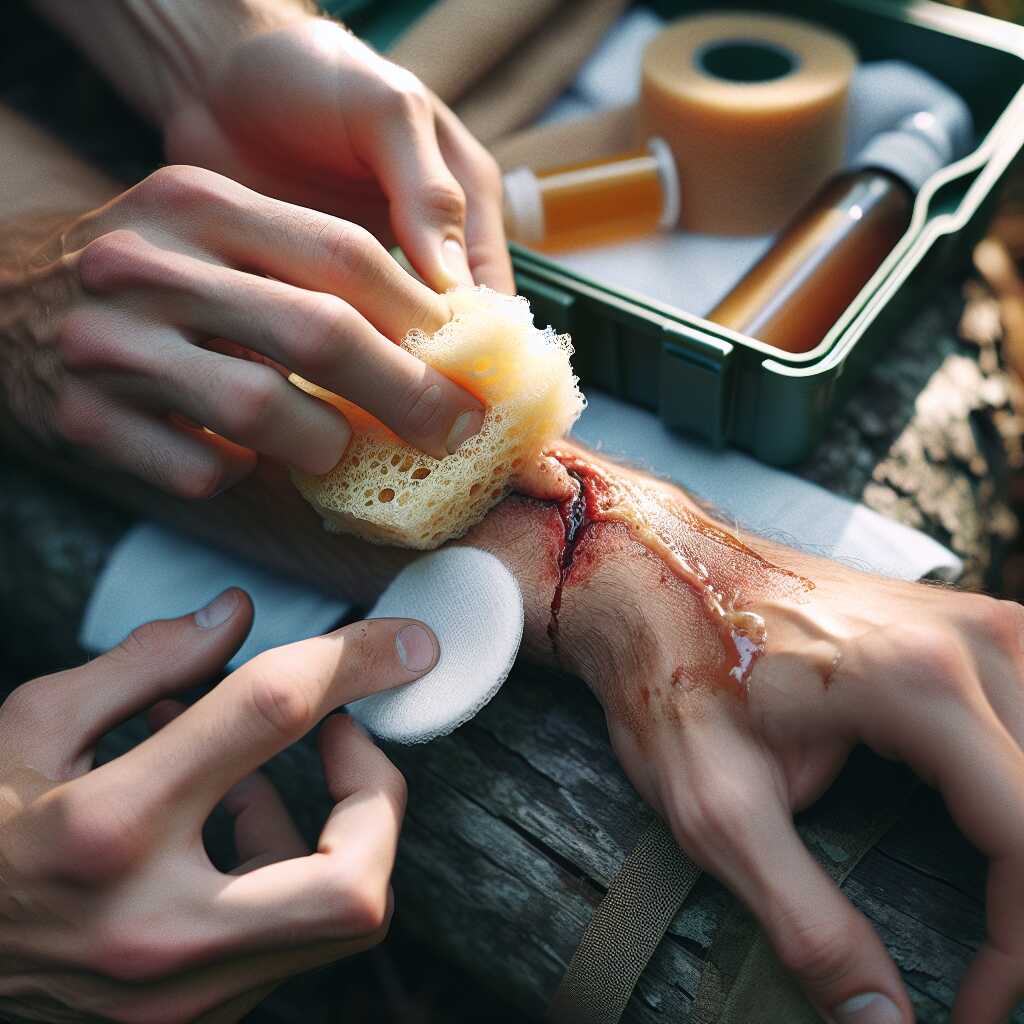
How To – Sea Sponges: Gentle Wound Debridement Tools for Cleaning Injuries
By Predicament Measures
Quick Answer: Can sea sponges be used to debride wounds
Yes sea sponges can provide gentle mechanical debridement for superficial wounds because their porous texture helps lift loose slough and debris, but they are not sterile and cannot replace surgical or enzymatic debridement and carry infection and allergy risks.
- Effectiveness: Not quantified due to lack of controlled clinical trials; anecdotal reports indicate useful removal of loose superficial slough but ineffective for firmly adherent necrosis.
- Cost: Retail natural sea sponges typically $3 to $15 each versus sterile gauze pads around $0.05 to $1 each; professional sterilization or medical-grade alternatives can add $5 to $20 per item.
- Time: Typical cleaning and gentle debridement of a small superficial wound: 5 to 15 minutes depending on wound size and contamination.
- Limitation: Cannot perform definitive surgical debridement, cannot remove firmly adherent necrotic tissue, not sterile unless processed, and may introduce infection or cause allergic reactions.
Sea sponges are natural porous marine organisms used as soft absorbent cleaning tools; in wound care they can act as a gentle mechanical debriding material for superficial slough. This $3-$15 solution can help lift loose debris and slough compared to sterile gauze at $0.05-$1 each, but only when a medical-grade or properly processed sponge is used consumer sponges are not sterile.
The process works through three key relationships: the sea sponge’s porous surface lifts loose slough resulting in visible removal of surface debris within about 5-15 minutes, moistening the sponge with 0.9 sterile saline enables gentle mechanical action without aggressive tissue disruption, and controlled light pressure and short, repeated passes create a cleaner wound bed suitable for reassessment and proper dressing.
How to clean and gently debride a superficial wound with a sea sponge step by step
- Assess the wound (1-2 minutes): Check depth, size, foreign bodies, active bleeding, and contamination. Instruction: If the wound is deep, gaping, pulsatile bleeding, contains foreign debris embedded, or shows signs of severe contamination, seek professional medical care immediately. Result: Decision to proceed with minor-field debridement or to escalate to advanced care.
- Gather sterile supplies (2-5 minutes): Instruction: Use medical-grade sterile sea sponge if available; otherwise use sterile gauze pads (0.05-$1 each) or purchase medical-grade sponges ($5-$20 after processing). Include 0.9 sterile saline, disposable gloves, forceps if needed, antiseptic as prescribed, and sterile dressings sized to wound. Result: Ready, sterile setup that minimizes infection risk.
- Hand hygiene and protection (1 minute): Instruction: Wash hands thoroughly and don single-use gloves. Result: Reduced risk of contaminating the wound.
- Prepare the sponge (30-60 seconds): Instruction: Open sterile sponge package. If using a commercially processed sterile sponge, moisten it with 0.9 sterile saline (enough to make the sponge pliable but not dripping). Do not use non-sterile household sponges on open wounds. Result: Pliable, saline-moistened sponge suitable for gentle cleaning.
- Irrigate the wound (1-3 minutes): Instruction: Use a steady stream of sterile saline to irrigate gross debris first (15-30 mL syringe or gravity irrigation). Result: Reduced loose contamination prior to debridement.
- Gentle mechanical debridement with sponge (5-15 minutes): Instruction: Using light pressure, wipe or stroke the wound surface in one direction with the moistened sterile sponge to lift loose slough and visible debris. Do not scrub or apply forceful pressure. Limit passes to small areas and reassess frequently. Result: Removal of loose superficial slough and visible debris; cleaner wound surface for assessment.
- Reassess and repeat if necessary (1-3 minutes per repeat): Instruction: If debris remains and tissue appears viable, repeat irrigation and gentle sponge passes. If tissue resists removal or necrotic tissue is firmly adherent, stop and arrange surgical/medical debridement. Result: Determination of whether sea-sponge debridement was successful or if escalation is required.
- Apply topical agent and dressing (2-5 minutes): Instruction: Apply any clinically indicated topical (per protocol) and cover with a sterile dressing sized to the wound. Result: Protected wound bed ready for follow-up and healing.
- Document and advise follow-up (1-2 minutes): Instruction: Record wound appearance, materials used (including whether a sterile medical-grade sponge was used), time spent (typically 5-15 minutes for small wounds), and instructions for reassessment. Advise patient/guardian to seek professional care for signs of infection, increasing pain, spreading redness, fever, or failure to improve. Result: Clear plan for monitoring and next steps.
FAQ
What is a sea sponge exactly used for wound cleaning
A natural sea sponge provides gentle mechanical cleaning for superficial wounds by lifting loose slough and debris with its porous texture and capillary action. Sea sponges cost about $3 to $15 each retail and can be used wet for wound irrigation and gentle debridement for 5 to 15 minutes depending on wound size. Predicament Measures includes expert review notes that sea sponges are useful for light cleaning but are not sterile and cannot replace surgical, enzymatic, or definitive debridement.
How does a sea sponge compare to sterile gauze for wounds
A sea sponge offers a softer, more absorbent surface than many sterile gauze pads and can handle delicate tissue with less friction. Sterile gauze pads cost about $0.05 to $1 each and provide known sterility and predictable absorbency while sea sponges provide comfort and natural texture but lack certified sterility and testing data.

How does sea sponge debridement work step by step in wounds
Sea sponge debridement works by using the sponge’s porous matrix to absorb exudate and lift loose slough and dirt from wound surfaces while avoiding aggressive scraping of viable tissue. Typical use takes about 5 to 15 minutes for a small superficial wound and may take 15 to 30 minutes for larger contaminated abrasions, with repeated gentle passes rather than forceful rubbing. Reliability is limited by lack of controlled trials and clinical testing, so clinicians should view sea sponges as a temporary, gentle tool that helps initial cleaning but does not replace medical debridement when necrosis or deep infection exists.
What are the exact steps for preparing a sea sponge safely
Clean a new natural sea sponge by rinsing under running potable water for 1 to 2 minutes, then boil in water for 5 to 10 minutes or commercially sterilize if required, noting professional sterilization adds $5 to $20 per item. For wound use wet the sponge with sterile saline 0.9 or clean potable water, squeeze excess fluid to a damp state, and perform gentle dabbing motions for 5 to 15 minutes while monitoring bleeding and pain.

What are the main benefits of using sea sponges for wounds
Sea sponges provide gentle mechanical debridement that helps remove loose slough and surface debris while preserving fragile tissue and reducing pain compared with rough materials. Benefits include low initial cost of $3 to $15 per sponge, softness that improves patient comfort, and absorbent pores that enhance fluid uptake during 5 to 15 minute cleaning sessions. Practitioners and caregivers report good user experience in reviews for light cleaning tasks but note that research and testing do not provide standardized success rates for all wound types.
How does using a sea sponge reduce pain and tissue loss
The soft, elastic structure of a sea sponge reduces shear and friction on granulating tissue and thus can feel more comfortable during cleaning versus coarse gauze, which helps decrease procedural pain. Reduced force during cleaning helps limit inadvertent tissue removal but cannot prevent loss when deep necrosis or adhered tissue requires surgical debridement.

What are the risks and limitations of sea sponge wound cleaning
Sea sponge use carries infection, contamination, and allergy risks because most natural sponges are not sterile and can house marine organisms, bacteria, or retained debris that may introduce pathogens into a wound. Sea sponges cannot perform definitive surgical debridement, cannot remove firmly adherent necrotic tissue, and have no quantified success rates from clinical trials so users must limit use to superficial cleaning and initial wound care. Cost comparisons show sea sponges affordable up front but professional sterilization or choosing medical-grade alternatives raises costs to $5 to $20 per item and improves reliability and safety.
What infection allergic and contamination risks exist with natural sponges
Natural sea sponges may contain bacteria, fungal spores, or microscopic marine debris and can provoke allergic contact dermatitis in some users, so risk is real for contaminated wound infection and allergy. Clinicians should test skin sensitivity in low-risk areas and consider sterile single-use alternatives for immunocompromised patients, open fractures, or deep wounds.

Who should consider using sea sponges for wound cleaning and care
First responders, EMTs, outdoor enthusiasts, caregivers, and wound care nurses may consider sea sponges for gentle cleaning of superficial abrasions, blisters, and lightly sloughing wounds when sterile supplies are not available. Sea sponges provide a useful, low-cost option for short-term cleaning in remote or austere settings and can help preserve tissue and reduce pain during irrigation sessions of about 5 to 15 minutes. Predicament Measures advises using sea sponges only with caution and clear protocols, ensuring follow-up care, and prioritizing sterile, medical-grade alternatives when possible.
Which patients and providers should avoid or prefer sea sponge use
Providers should avoid sea sponge use for deep, heavily contaminated, necrotic, or surgical wounds and for patients who are immunocompromised, diabetic with poor circulation, or have open fractures. Preferred candidates include healthy adults with superficial abrasions or caregivers in remote settings who need a gentle, comfortable cleaning tool and who can access follow-up care within 24 to 72 hours.

Alternatives, costs, and recommended supplies for safe wound cleaning
Sterile gauze, sterile saline 0.9, medical-grade foam dressings, and single-use sterile sponges provide tested sterility and predictable performance and typically cost $0.05 to $5 per item depending on type and packaging. Commercial sterile sponges and gauze offer proven reliability and testing data, with professional sterilization for reusable items adding $5 to $20 per item when needed. Predicament Measures lists alternatives, pricing ranges, and supplier reviews to help providers choose options that enhance safety and cleaning efficiency.
Image assets and web page resources
Provide high-resolution images at 1200×800 px for hero photos and 800×600 px for detail shots, use JPG or PNG files under permissive stock licenses or own photography, and include descriptive alt text for accessibility. Include captions, suggested file names like “sea-sponge-cleaning-1200×800.jpg” and image credit lines, and deliver images sized under 500 KB when possible for fast page load and good performance.
When is the best time to use sea sponges during wound treatment
The best time to use a sea sponge is for initial cleaning of small, superficial wounds after active bleeding has stopped and loose slough or debris is visible. Use sea sponges within the first 24 to 72 hours after injury when the wound is stable and when gentle mechanical debridement can help remove loose material in about 5 to 15 minutes per wound. Sea sponges provide gentle mechanical action but are not sterile, cannot replace surgical or enzymatic debridement, and carry infection and allergy risks that limit their use in high-risk or deep wounds.
How soon after injury can a sea sponge be used for gentle debridement
You can use a sea sponge once hemostasis is achieved, typically 5 to 30 minutes after pressure stops bleeding and the wound is stable. Use sponges for superficial cleaning that often takes 5 to 15 minutes, and avoid sponges on deep punctures, heavily contaminated wounds, burns, or in immunocompromised patients.
How much do sea sponges cost compared to medical wound care supplies
Sea sponges retail for about $3 to $15 each while single-use sterile gauze pads sell for about $0.05 to $1 each, so sea sponges cost more per unit but offer a durable, reusable texture for field cleaning. Professional sterilization or purchasing medical-grade sponge alternatives can add roughly $5 to $20 per item, changing the cost comparison when you include testing, processing, and sterilization. Cost alone does not guarantee safety or reliability because sea sponges are nonsterile by default and show no controlled-trial data proving superior outcomes over low-cost sterile supplies.
What is the per unit price and sterilization cost for sea sponges
A typical natural sea sponge costs $3 to $15 per unit at retail depending on size and source, and bulk purchase prices can vary by supplier and quality review. Sterilization processing at a medical facility or contract service commonly adds $5 to $20 per sponge depending on method, volume, and local service rates, and sterilization is essential to improve safety and reliability if you plan reuse.
What materials and tools are needed to use a sea sponge safely on wounds
To use a sea sponge safely you need nitrile gloves, sterile 0.9 saline (a 30 to 60 mL syringe or a 500 mL irrigation bottle), antiseptic like chlorhexidine or povidone for surrounding skin, sterile forceps, and sterile dressings such as 4×4 gauze and adhesive tape. Add a clean tray, biohazard waste bag, and a single-use clean water source for rinsing; these items improve testing, hygiene, and field performance during cleaning and gentle debridement. Sea sponges provide useful texture for lifting loose debris but they are not sterile unless processed, and they cannot remove firmly adherent necrosis or replace professional surgical debridement.
What cleaning sterilization and dressing supplies are required after use
After using a sea sponge you must irrigate with sterile saline, apply an antiseptic to the wound edges, cover with a sterile dressing such as a 4×4 gauze and a 2×2 or 4×4 sterile pad, and secure with tape or a conforming bandage; typical dressing change interval is every 24 to 48 hours based on contamination and clinician review. If you plan to reuse a natural sponge, arrange for validated sterilization such as autoclave or medical sterilization services and document testing and sterilization records; if you cannot sterilize, discard the sponge and use sterile single-use supplies to ensure safety.
What are the best alternatives to sea sponges for gentle wound debridement
Best alternatives include sterile 4×4 gauze pads for mechanical cleaning, 0.9 saline irrigation with a 30 to 60 mL syringe for pressure irrigation, topical enzymatic agents such as collagenase when available, and surgical debridement by trained clinicians for definitive removal of necrotic tissue. Saline irrigation provides reliable removal of loose debris, enzymatic agents provide controlled debridement over days to weeks, and surgical debridement delivers immediate removal of firmly adherent necrosis but requires expertise and a sterile setting. Sea sponges can help in austere settings but they do not match the proven testing, reliability, and effectiveness of sterile medical supplies or professional debridement for complex wounds.
How do saline irrigation enzymatic and surgical debridement compare to sponges
Saline irrigation with 30 to 60 mL syringes and appropriate nozzle pressure offers fast removal of loose debris in 5 to 30 minutes and is safe and low cost compared to sea sponges. Enzymatic debridement works over days to weeks and suits nonurgent removal of slough with clinical review; surgical debridement gives immediate, definitive removal in a single procedure but requires trained personnel and a sterile environment. Sea sponges remain useful for gentle tactile cleaning in field care but they cannot replace enzymatic timeframes or surgical effectiveness for adherent necrosis.
What common mistakes should be avoided when using sea sponges on wounds
Common mistakes include using nonsterile sponges on deep wounds, scrubbing aggressively and causing tissue damage, reusing sponges without validated sterilization, and applying sponges to heavily contaminated or high-risk wounds such as bites or crush injuries. Excessive scrubbing can worsen tissue injury and increase infection risk, and reuse without sterilization can introduce pathogens; these errors reduce reliability and safety. Predicament Measures recommends avoiding sea sponge use on high-risk wounds and choosing sterile alternatives when available to enhance patient safety.
How can errors like using nonsterile sponges or excessive scrubbing be prevented
Prevent errors by using single-use sterile supplies when possible, wearing gloves, rinsing the wound with sterile saline before applying any sponge, and using gentle strokes with light pressure for 5 to 15 minutes while monitoring the wound. If you must use a natural sponge, inspect it visually, rinse thoroughly with clean water, arrange for professional sterilization, and document the cleaning and sterilization process to ensure reliability and traceability.
Recommended image assets for the web page
Include clear, labeled images that show a sea sponge next to sterile gauze, a step-by-step cleaning sequence, and a comparison image of sponge cleaning versus saline irrigation to help readers review technique and results. Use images that display tools such as a 30 to 60 mL syringe, nitrile gloves, 4×4 gauze, and a sterile dressing to deliver practical visuals for first responders, EMTs, wound care nurses, caregivers, and outdoor users. Predicament Measures recommends sourcing high-resolution photos for review and testing, and adding caption text that highlights timeframes (5-15 minutes), costs ($3-$15 per sponge), and limitations of sea sponges.
Image file names alt text and suggested sizes
Use descriptive file names and alt text such as sea-sponge-vs-gauze.jpg alt=”Sea sponge beside sterile 4×4 gauze for wound cleaning” size 1200×800, sponge-cleaning-steps.jpg alt=”Step by step use of sea sponge for gentle wound cleaning, 5 to 15 minutes” size 1200×800, saline-irrigation-30ml.jpg alt=”30 to 60 mL syringe used for 0.9 saline irrigation at the wound” size 1200×800. Provide image credits, license type, and brief captions that include cost ranges, timeframes, and safety notes to enhance review and usability on the Predicament Measures site.
Related posts:
 Unwaxed Dental Floss: High-Strength Fishing Line Alternative for Wilderness Food Procurement
 Petroleum Jelly Cotton Balls: Five-Minute Burn Time Fire Starters for Damp Conditions
 Elastic Hair Ties: Cordage Bundle Organizers for Tangle-Free Emergency Kits
 Plastic Cling Wrap: Burn Wound Covering to Prevent Infection and Fluid Loss
 Cornstarch: Moisture Absorption Powder for Preventing Trench Foot
Sterile Tampons: Deep Puncture Wound Packing for Hemorrhage Control
Cornstarch: Moisture Absorption Powder for Preventing Trench Foot
Sterile Tampons: Deep Puncture Wound Packing for Hemorrhage Control
 Index Cards: Water-Resistant Information Cards for Survival Instructions