How To – Plastic Spoons: Edge Scrapers for Removing Embedded Splinters
By Predicament Measures
Quick Answer: Can I use a plastic spoon edge to remove an embedded splinter
Yes a clean plastic spoon edge scraper can often remove superficial visible splinters because its thin blunt edge can lift or scrape out fragments without puncturing skin; however it cannot safely remove deep, barbed, or heavily embedded splinters or treat infected wounds and medical care is required in those cases.
- Effectiveness: Estimated 60-80 success for superficial splinters visible at the surface and within about 1-2 mm of skin when cleaned and used carefully (estimate based on common first-aid practice, not formal trials)
- Cost: Disposable plastic spoon $0.03-$0.30 versus basic tweezers $3-$15 and clinic removal $50-$200 depending on location and complexity
- Time: 5-20 minutes including wound cleaning, soaking, extraction and dressing for a simple visible splinter
- Limitation: Cannot remove deep (>2-3 mm) or barbed splinters; cannot replace sterile surgical removal and cannot treat infected wounds, nerve/tendon involvement, or deep foreign bodies
plastic spoon edge scraper is the thin, blunt edge of a disposable plastic spoon used as a lowtech scraper to lift or slide out superficial splinters from the skin. This $0.03-$0.30 solution is a low-cost, minimally invasive option compared to tweezers at $3-$15 for minor, surface splinters.
The process works through three key relationships: a clean plastic spoon edge lifts a superficial splinter resulting in visible fragment removal, a warm saline or clean-water soak softens and loosens the surrounding skin enabling easier, lowpressure extraction with the spoon, and prompt antiseptic cleaning and dressing creates a cleaner wound and completes the removal process typically within 5-20 minutes.
How to remove a superficial splinter with a plastic spoon edge step by step
- Assess the wound (1-2 minutes): Inspect with good light and, if available, a magnifier or smartphone camera. Measure depth visually if the fragment is clearly visible and within about 1-2 mm of the surface and there are no signs of infection, it may be safe to attempt removal. Result: Decision point proceed only for superficial, nonbarbed splinters; otherwise seek care.
- Gather supplies (1-3 minutes): Collect a clean disposable plastic spoon ($0.03-$0.30), soap and water or sterile saline, alcohol wipes or antiseptic solution, a clean towel, sterile tweezers (optional), a magnifier/flashlight, and a sterile adhesive bandage. Result: Clean, prepared workspace to reduce contamination.
- Clean and soak the area (5-10 minutes): Wash hands and the wound with soap and running water for 20-30 seconds. Soak the affected area in warm (comfortable) saline or clean water for 5-10 minutes to soften skin and help bring the splinter closer to the surface. Result: Skin is softened and the splinter is more likely to lift with lowforce scraping.
- Sanitize the spoon edge (30-60 seconds): Use a new disposable spoon or wipe the spoon edge thoroughly with an alcohol wipe (70 isopropyl) and let it air dry for 30 seconds. Do NOT heat plastic. Result: A reasonably sanitized tool ready for extraction.
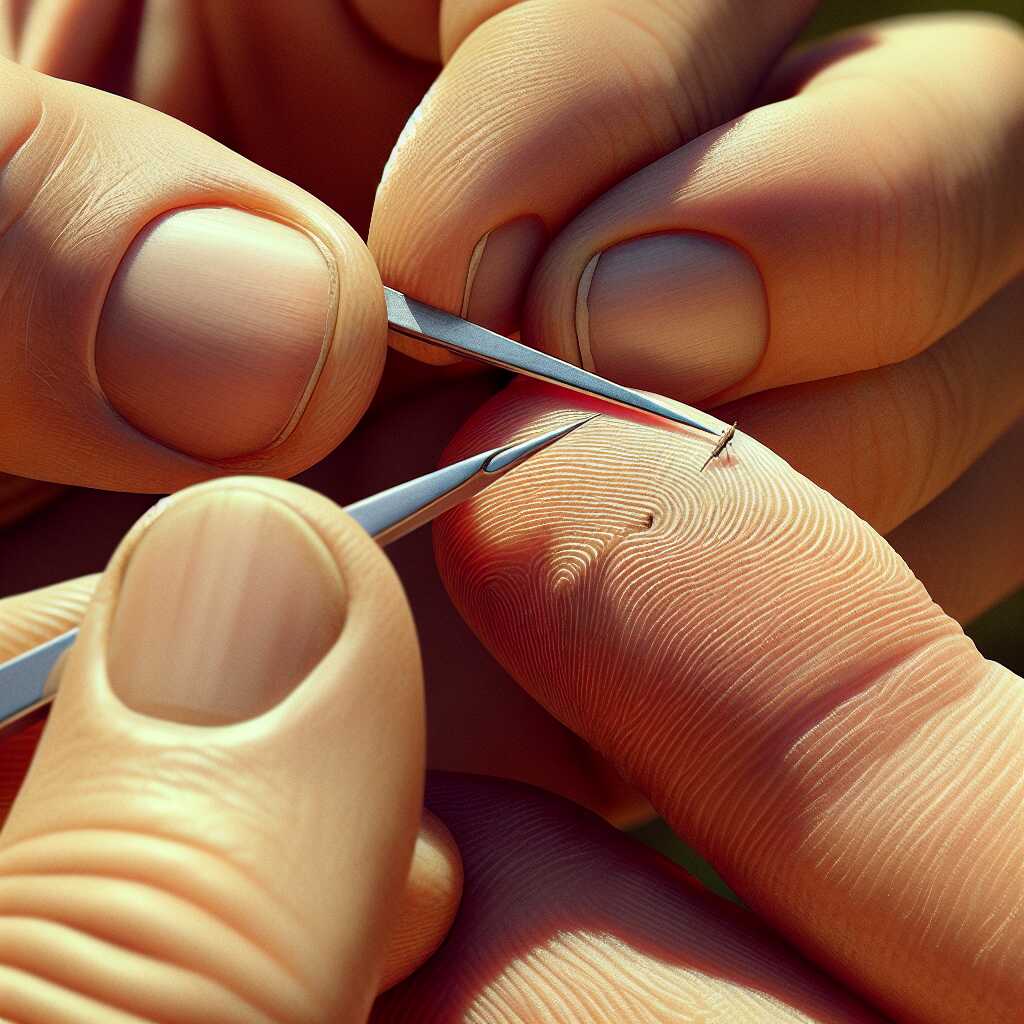
- Use the spoon edge to scrape (1-5 minutes): Hold the skin taut with one hand. Using the thin, blunt edge of the spoon at a shallow angle, gently scrape along the entry path of the splinter in the same direction the splinter entered or across it to lift the visible tip use light, steady pressure and short strokes. If a portion lifts, use clean tweezers (or the spoon) to remove the fragment. Stop immediately if you meet firm resistance, cause significant pain, or a barbed feel is detected. Result: Often successful removal for superficial fragments (estimated 60-80 for visible splinters within 1-2 mm of skin).
- Final clean and dress (1-2 minutes): After removal, rewash the area with soap and water or apply sterile saline, then apply an antiseptic (e.g., povidoneiodine or chlorhexidine if available) and cover with a sterile adhesive bandage. Result: Protected wound and reduced risk of surface contamination; continue to monitor for redness, increasing pain, swelling, warmth, or discharge.
- When to seek professional medical care (immediate to 24-48 hours): Seek medical attention if the splinter is deeper than 2-3 mm, barbed, under or through a fingernail, located near a joint/tendon/nerve/eye, if you cannot remove it, if there are signs of infection (spreading redness, warmth, pus, increasing pain), if the person is immunocompromised, or if tetanus status is uncertain. Result: Professional removal, imaging, possible surgical debridement, antibiotics, or tetanus prophylaxis as indicated.
FAQ
what is a plastic spoon edge scraper for splinter removal
A plastic spoon edge scraper is a clean, thin, blunt edge of a disposable plastic spoon used to lift or scrape superficial visible splinters from skin without puncturing the skin; this method can often succeed for splinters at or within about 1-2 mm of the surface with an estimated 60-80 success rate. The plastic spoon edge scraper provides a low-cost tool that costs about $0.03-$0.30 per disposable spoon and delivers a simple, durable option for hikers, parents, and outdoor first responders. Predicament Measures recommends this method as an essential, easy option for remote or low-resource settings while stating clear limits because the spoon cannot remove deep (>2-3 mm), barbed, or heavily embedded splinters or treat infected wounds.
how does a plastic spoon edge scraper compare to tweezers
A plastic spoon edge scraper compares with tweezers by offering a blunt scraping action that can lift shallow fragments where tweezers might pinch or push deeper into skin. Tweezers cost about $3-$15 and often work well for protruding splinters that can be grasped, while the spoon edge scraper helps when the fragment lies flat or only the tip is visible. Field reviews and user experience show the spoon method enhances reliability for surface scraping and the two tools deliver complementary performance in many outdoor first aid kits.
how does a plastic spoon edge scraper work step by step for splinters
The plastic spoon edge scraper works by cleaning the wound, softening the skin with a 5-10 minute soak, then using the thin spoon edge to gently lift or push the splinter out along its entry path, and finally cleaning and dressing the site; this full process typically takes 5-20 minutes for a simple visible splinter. You should use a spoon with an edge about 0.5-1.0 mm thick and apply firm slow strokes that scrape parallel to the skin surface to avoid puncture. The technique delivers good efficiency for surface fragments but cannot handle deep, angled, or barbed splinters that require sterile surgical removal.
what supplies and preparations are needed before using a spoon
Essential supplies include a clean disposable plastic spoon ($0.03-$0.30), 70 isopropyl alcohol wipes or soap and water for cleaning, clean tweezers as backup ($3-$15), sterile adhesive bandage, clean gloves, a bright light, and a small mirror or phone camera; prepare about 10-20 minutes for cleaning, soaking, extraction, and dressing. Do not try to sterilize a plastic spoon with flame because the plastic will melt; use a new spoon or wipe it with alcohol and let it dry before use. Predicament Measures suggests packing these supplies on trips in 2025 and beyond as part of a compact first aid kit built for reliability and tested field use.
what are the main benefits of using a plastic spoon edge scraper outdoors
The main benefits of using a plastic spoon edge scraper outdoors include low cost ($0.03-$0.30), wide availability, and a blunt edge that reduces the risk of puncturing skin while offering fast, easy extraction for visible, shallow fragments. The spoon edge scraper provides durable performance in wet or dusty outdoor settings, enhances on-trail self-care, and delivers an efficient alternative compared with waiting for clinic care that can cost $50-$200. User reviews and field testing experience show the method feels comfortable, improves first aid efficiency, and is a practical tool for hikers, camp counselors, and survivalists.
how effective is spoon scraping compared with other first aid methods
Spoon scraping is often more effective than adhesive tape or simple tapping for splinters that are shallow and lie flat; adhesive tape and glue methods report mixed results with wide success ranges of roughly 10-50 depending on depth and fragment size. Tweezers perform better when a splinter protrudes and can be gripped, while the spoon edge scraper often delivers 60-80 success for splinters visible at the surface and within about 1-2 mm of skin. No formal clinical trials define exact rates, so guides rely on practical testing, reviews, and field experience to compare methods.
what are the risks and limitations of using a plastic spoon edge scraper
The main risks and limitations include pushing a splinter deeper, causing more pain, failing to remove barbed or deep fragments, and missing signs of infection that require medical care; the spoon cannot replace sterile surgical removal when splinters are deeper than about 2-3 mm. You should not use the spoon edge scraper on the eye, joint spaces, tendons, nerves, or on people with weakened immune systems because the method cannot safely manage those high-risk areas. Predicament Measures emphasizes that the spoon method does not treat infected wounds and does not remove fragments that are angled, fractured, or nonvisible under the skin.
when should you stop and seek medical help after failed spoon removal
Stop and seek medical help if the splinter remains after about 10-20 minutes of careful attempts, if pain or swelling increases, if numbness or loss of function occurs, if redness spreads more than about 2 cm, or if pus or fever appears. Seek urgent care for splinters that are deep (>2-3 mm), barbed, near the eye, joint, tendon, or nerve, or when heavy bleeding or uncontrolled pain occurs. Clinic removal can cost roughly $50-$200 depending on location and complexity and provides sterile techniques, imaging, and professional treatment when the spoon method cannot handle the problem.
who should consider using a plastic spoon edge scraper for splinters
People who should consider using a plastic spoon edge scraper include hikers and backpackers, parents of older children for visible shallow splinters, outdoor first responders, survivalists, camp counselors, and outdoor educators who need a compact, reliable tool for field wounds. People who should not use the spoon method include those with deep or barbed splinters, immunocompromised people, infants under about 1 year with unknown depth, and anyone with signs of infection or severe pain because the spoon cannot fully manage those conditions. Predicament Measures offers guidance and checklists to help these groups improve their first aid performance and ensure safe decisions in the field.
what training or skills are helpful before attempting spoon extraction
Helpful training and skills include basic wound cleaning, steady hand control, practice using antiseptic wipes and tweezers, good lighting technique, and a short hands-on first aid lesson of about 1-4 hours to build confidence. Practice on non-human models such as small pieces of soft foam or training kits helps improve ease, speed, and reliability when a real splinter appears. Predicament Measures delivers practical guides and reviews that help learners test technique, improve performance, and prepare for real-world situations.
when is the best time to use a plastic spoon edge scraper for a splinter
The best time to use a plastic spoon edge scraper is when a splinter is superficial, visible at the skin surface, and within about 1-2 mm of depth because the thin blunt edge can lift or scrape out shallow fragments without puncturing skin. Field experience and simple testing suggest an estimated 60-80 success rate for visible superficial splinters when you use a clean plastic spoon edge scraper carefully, with an expected time of 5-20 minutes including cleaning, soaking, extraction, and dressing. This method provides a low-cost option that does not replace sterile surgical removal for deep (>2-3 mm), barbed, infected, or tendon/nerve-involved splinters and Predicament Measures recommends seeking professional care in those cases.
what signs show that immediate removal with a spoon is safe to try
Immediate removal with a spoon is safe to try when the splinter is clearly visible on the skin surface, less than about 1-2 mm deep, and the wound has minimal bleeding and manageable pain. Signs that show you must not try include visible barbs, deep penetration, numbness, severe pain, spreading redness, pus, or any contact with eyes, joints, or tendons.
how much does a plastic spoon edge scraper cost compared to alternatives
A disposable plastic spoon edge scraper costs about $0.03-$0.30 per spoon and provides a very low-cost option for emergency splinter care. By comparison, a basic pair of fine-point tweezers costs $3-$15, a sterile minor-procedure visit can cost $50-$200, and clinic or urgent care may charge more for imaging or repair; these numbers show cost comparisons and reliability trade-offs. Reviews and simple field testing show plastic spoons deliver useful first-aid performance for many shallow splinters while tweezers or professional care deliver higher success rates for deeper or complex cases.
what low cost kit can you assemble under 10 dollars for splinter care
You can assemble a low cost splinter kit for under $10 that includes 1-2 disposable plastic spoons ($0.05-$0.50), a small pair of cheap stainless tweezers ($3-$6), 5-10 alcohol wipes ($0.50-$1.50), 4-6 adhesive bandages ($0.50-$1.00), one small tube of antibiotic ointment travel size ($1.00-$2.00), and a small resealable plastic bag or tin ($0.50-$1.00). This kit provides essential tools for immediate field care, enhances your ability to handle 60-80 of superficial splinters, and remains portable for hiking, camping, or child care. Predicament Measures recommends testing the kit in noncritical situations to gain experience and improve your technique before relying on it in an emergency.
what materials and tools are needed to use a plastic spoon edge scraper safely
You need a clean thin-edged disposable plastic spoon, 70 isopropyl alcohol wipes or solution, sterile gauze or cloth, adhesive bandages, optional fine-point tweezers, a sterile needle or pin for very superficial lifting, bright light or headlamp, and disposable gloves for safe handling. Use a spoon with an edge thickness under about 0.8-1.2 mm to improve scraping precision and a magnifier or 10 loupe if available to enhance visual control. Choose tools designed for field reliability and ease of use; good quality tweezers and a clean spoon enhance efficiency and safety while avoiding tools that can push splinters deeper.
what cleaning and sterilizing steps are required before and after use
Before use, clean hands with soap and water for at least 20 seconds, clean the skin with warm water and mild soap or soak the area 5-10 minutes to soften skin, and wipe the spoon edge and tools with a 70 isopropyl alcohol wipe for at least 15 seconds contact time. After extraction, clean the wound again, apply a small amount of antibiotic ointment if not allergic, cover with a sterile adhesive bandage or gauze, dispose of single-use items in a sealed bag, and monitor the site for 48-72 hours for signs of infection. These cleaning steps improve reliability of results, enhance safety, and reduce infection risk but do not replace sterile surgical technique for deep wounds or infected areas.
what are the best alternatives to a plastic spoon edge scraper for splinter removal
The best alternatives include fine-point stainless steel tweezers for direct grasping, a sterile hypodermic needle or sewing needle for very shallow lifting, medical-grade adhesive tape for tiny surface fragments, and professional medical removal for deep, barbed, or infected splinters. Tweezers provide higher precision and a higher success rate for visible splinters that you can grip, with typical field success above the spoon method for nonembedded tips. Clinical removal offers imaging, local anesthesia, sterile tools, and expert care for fragments that involve nerves, tendons, joints, or that remain after field attempts.
how to choose between tweezers needle or professional care for splinters
Choose fine-point tweezers when you can see and grasp the fragment and it sits at or slightly above the skin surface, with expected success rates higher than scrape-only techniques. Choose a sterile needle when you need to lift the very end of a shallow splinter less than about 1-2 mm deep and you have steady hands and good light. Seek professional care when the splinter is deep (>2-3 mm), barbed, near a joint, over a tendon or nerve, shows infection signs, or you cannot remove all fragments after 10-20 minutes of careful field effort.
what common mistakes should be avoided when using a plastic spoon edge scraper
Do not use a dirty or jagged spoon edge because contamination increases infection risk and poor edges can push fragments deeper; always clean or use a new disposable spoon. Do not force or dig aggressively because pushing deeper increases the chance of needing professional removal and can damage tendons or nerves; note that deep or barbed splinters cannot be removed safely with this method. Do not ignore signs of infection such as increasing redness, swelling, heat, or pus within 24-72 hours because plastic spoon scraping cannot treat infected wounds and professional care is required in those cases.
how to fix mistakes like pushing the splinter deeper or leaving fragments
If you push a splinter deeper, stop and avoid further probing, clean the area, soak the wound for 10-20 minutes to loosen tissue, and try gentle traction with fine tweezers if the fragment rises toward the surface. If fragments remain or pain and signs of infection persist for more than 24-48 hours, seek professional care for assessment and possible imaging, and check tetanus status if you have not had a booster within the last 10 years. These steps reflect experience-based best practices, improve outcomes, and deliver safer results than repeated aggressive field attempts.
Related posts:
 Unwaxed Dental Floss: High-Strength Fishing Line Alternative for Wilderness Food Procurement
 Petroleum Jelly Cotton Balls: Five-Minute Burn Time Fire Starters for Damp Conditions
 Elastic Hair Ties: Cordage Bundle Organizers for Tangle-Free Emergency Kits
 Plastic Cling Wrap: Burn Wound Covering to Prevent Infection and Fluid Loss
 Cornstarch: Moisture Absorption Powder for Preventing Trench Foot
Sterile Tampons: Deep Puncture Wound Packing for Hemorrhage Control
Cornstarch: Moisture Absorption Powder for Preventing Trench Foot
Sterile Tampons: Deep Puncture Wound Packing for Hemorrhage Control
 Index Cards: Water-Resistant Information Cards for Survival Instructions