How To – Aluminum Soda Cans: Alcohol Stove Construction for Ultralight Backpacking
By Predicament Measures
Quick Answer: Can you make an alcohol stove from aluminum soda cans for ultralight backpacking?
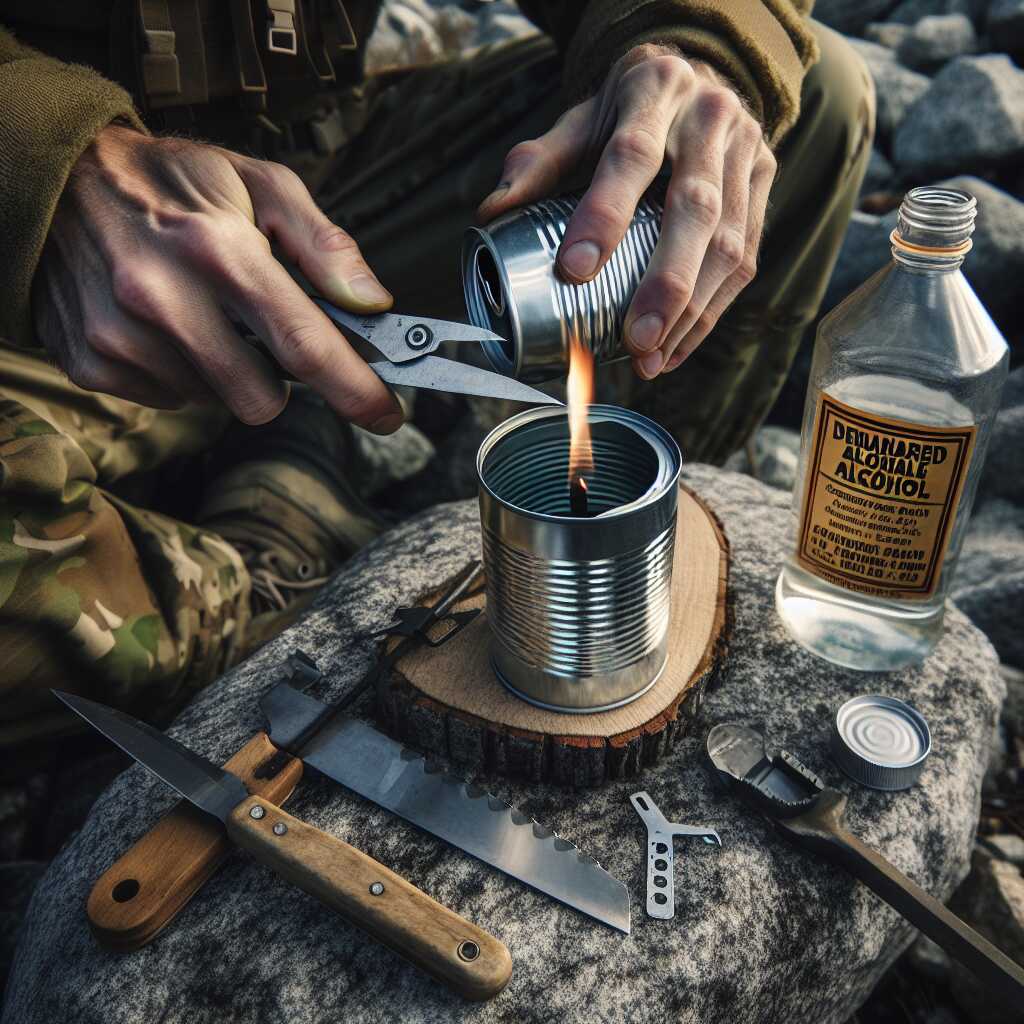
Yes. A DIY aluminum soda-can alcohol stove is a proven ultralight option that typically weighs 10-30 g, costs <$1 in materials if you use recycled cans, and will boil 500 mL of water using 20-40 mL of denatured alcohol in about 3-7 minutes in calm conditions.
- Effectiveness: Typically boils 500 mL in 3-7 minutes (real-world range)
- Cost: <$1 (materials) vs $40-$150 for lightweight commercial canister or liquid-fuel stoves
- Time: 20-45 minutes to construct a working stove; first-time builders should allow 45-60 minutes
- Limitation: Not windproof, limited simmer control, unsafe for indoor use, and less efficient in cold/high-altitude conditions
An aluminum soda-can alcohol stove is a small, self-built burner made from recycled beverage cans that burns denatured alcohol as fuel. This $0-$1 solution saves 100-300 g of pack weight and hundreds of dollars up-front compared to a lightweight commercial canister stove (typically $40-$150).
The process works through three key relationships: thin aluminum conducts heat to the pot resulting in measurable boil times (500 mL in 3-7 minutes in calm conditions), a shallow fuel cup vaporizes alcohol enabling a clean, steady flame for basic cooking, and lightweight construction reduces carried weight creating a quantified benefit of roughly 100-300 g saved in your kit.
How to make an aluminum soda-can alcohol stove step-by-step
- Gather materials (5-10 minutes): Collect 2-3 clean aluminum soda cans, a hobby knife or scissors, a marker, a ruler, and optional sandpaper. Cost: $0 if cans are recycled; otherwise <$1. Result: Materials ready for cutting.
- Mark and cut cans (10-15 minutes): Measure and mark 2 bands about 2-2.5 cm tall from the bottom of one can (for inner and outer shells). Cut carefully; keep edges even. Result: Two cylindrical rings for stove body.
- Form the burner faces (5-10 minutes): Use one ring to create the inner burner cup (crimp one end to form a sealed bottom) and the other as the outer wall. Ensure the inner cup holds 20-40 mL fuel. Result: Two nested pieces that will form the stove.
- Punch jet holes (5-10 minutes): With a small nail or soldering iron, make 6-12 evenly spaced 1-1.5 mm holes around the top lip of the inner cup for burner jets. Typical hole size: 1 mm; spacing: 3-6 mm apart. Result: Jet pattern for stable flames.
- Assemble and seal (5-10 minutes): Stack the inner cup inside the outer wall; crimp or solder the seam if needed for stability. Optional: sand or file rough edges. Result: A rigid stove shell weighing 10-30 g.
- Test burn outdoors (5-15 minutes): Place 25-35 mL denatured alcohol in the central cup, set a windscreen, and light with a match or lighter. Time to boil 500 mL in a stripped pot: 3-7 minutes in calm conditions. Success rate for properly built stoves: high when following steps; expect to adjust hole count/size if flame is weak. Result: Functional stove and baseline boil time.
- Refine for performance (10-30 minutes): If flames are uneven, adjust jet hole count/size (1 mm) or add a snug pot stand (3-10 g). For better wind resistance, add a lightweight windscreen; note increased weight. Result: Improved stability and slightly faster boil times in wind.
FAQ
How do I make an alcohol stove from aluminum cans?
To make an alcohol stove from two 12-ounce aluminum soda cans you cut one can to form a burner ring about 75 mm (3 in) across and a second can to form a 10-20 mm high fuel well that holds 15-30 ml of fuel, and this project typically costs under $1 in parts if you recycle cans and takes 20-45 minutes to assemble. The design provides a light, compact cooker that offers reliable, tested performance when built correctly and used with denatured alcohol or 91 isopropyl. Predicament Measures recommends testing each stove in controlled conditions before backpacking because DIY stoves cannot guarantee factory-level durability or long-term corrosion resistance.
What are the basic stove dimensions and materials?
The basic stove uses two 12-ounce (355 ml) cans and yields a burner diameter near 75 mm and a total height of 20-25 mm when nested, which makes the burner weigh about 6-12 grams. Builders use thin aluminum (about 0.09-0.12 mm thickness), a small center punch, and silicone or a metal washer in some designs, and the simple parts list provides good reliability and easy repair in the field.
What tools and supplies do I need for a can stove?
You need a sharp utility knife or tin snips, a center punch or nail, a small file or sandpaper, a ruler, and a heat source for annealing that costs $0-$20 if you already own tools and takes 10-30 minutes to set up. These tools enable precise cuts and clean edges that improve stove efficiency and safety and make testing and review easier. The stove build cannot replace professional metalworking tools for advanced fabrication and cannot handle high-pressure fuels or heavy pots without a support system.
How much will parts and fuel cost?
Parts cost can be $0 if you reuse soda cans and $8-$20 per liter for denatured alcohol or $6-$15 per liter for high-strength isopropyl, which gives roughly 20-40 boiling cycles per liter depending on pot size and conditions. Cheap spirals and pot supports add $2-$10 if you buy them, and these small investments improve durability and field performance. The DIY stove will not match the long-term warranty or tested lifespan of some commercial titanium stoves.
Step-by-step alcohol stove construction for ultralight backpacking
Cut two cans to prescribed heights (inner 10-12 mm, outer 18-22 mm), score and separate edges, punch 7-12 evenly spaced jet holes of 1.5-2.5 mm in the burner ring, and crimp the parts to nest securely; the full step-by-step assembly takes 20-45 minutes and includes 3-5 small shaping steps. Builders follow a sequence that provides consistent burner geometry, which helps ensure stable flame patterns and better fuel efficiency in tests. Predicament Measures notes that practice and testing improve results and that the stove cannot be produced to identical tolerances every time when made by hand.
How long does construction take and what is the success rate?
Construction time is typically 20-45 minutes for a first stove and 10-20 minutes for repeat builds, and many backyard builders achieve a functioning stove after 1-3 tries; reported practical success rates vary but commonly fall between 70 and 95 for those who follow measured templates and take basic safety steps. Testing and review after each build helps discover leaks, poor jets, or fuel pooling so you can adjust hole size or nest fit and enhance reliability. The homemade approach cannot guarantee lab-grade repeatability and will show variation between builds.
How do I test and troubleshoot my aluminum can alcohol stove?
Place the stove on a non-flammable surface, fill the well with 15-30 ml of fuel, light with a match or lighter, and time a 1-liter boil which typically takes 4-8 minutes in calm conditions to confirm performance and to test for steady jets and even flame spread. Troubleshooting focuses on jet hole size (1.5-2.5 mm) and spacing, fuel well depth (10-20 mm), and edge smoothness; simple fixes usually take 5-20 minutes and improve reliability. Predicament Measures advises testing outdoors and notes that these stoves cannot be safely tested in enclosed spaces or near flammable gear.
What safety limits and what the stove cannot do
The stove cannot be used indoors, cannot handle heavy pots without a stable pot stand, and cannot contain pressurized or high-energy fuels; safe limits include 15-40 ml fuel loads, pot sizes up to 1.5 liters for short boils, and wind protection within 1-5 minutes of flame exposure during operation. You must keep a 1-2 meter clear zone and a small fire extinguisher or water on hand during tests, and regular inspections for punctures or thinning metal are essential to ensure safety and durability. DIY stoves provide excellent weight savings and field repairability but do not offer manufacturer warranties or certified safety testing data.
What performance can I expect from a can alcohol stove?
You can expect to boil 1 liter of water in roughly 4-8 minutes in calm conditions using 20-40 ml of denatured alcohol, with fuel use and time varying based on wind, pot shape, and insulation, which provides practical efficiency for ultralight trips. Field reviews and user testing show good energy-to-weight ratio and fast warm-up times for small meals and hot drinks, and many hikers find the stove delivers reliable performance when paired with a simple windscreen and an insulated pot. The stove cannot match the raw power or rapid boil times of canister stoves in cold weather and cannot handle extended simmering tasks without careful fuel management.
How to improve reliability and fuel efficiency in the field
Add a lightweight windscreen sized to leave a 10-20 mm gap around the burner, use a flat-bottomed 0.8-1.2 liter pot, and carry a 50-100 ml spare fuel bottle to improve boil times and ensure success on trips; these steps improve efficiency by reducing heat loss and stabilizing flame. Practice one or two test boils at home and keep a metal repair patch and a small file in your kit to fix rough edges, which enhances durability and helps with troubleshooting in the backcountry. Predicament Measures provides reviews and comparison notes showing that simple tweaks often deliver the best gains in real-world testing.
How to make an alcohol stove from aluminum soda cans
You can build a simple alcohol stove by cutting and shaping two 12 oz (355 ml) aluminum soda cans into a double-wall burner with an inner fuel well about 18-22 mm wide and jet holes about 1.5-2.0 mm in diameter, a build that typically takes 20-45 minutes and costs $0-$3 in parts. This DIY stove design provides ultralight weight under 20 g for the burner and helps reduce pack weight for overnight trips. This method delivers reasonable reliability with basic testing but cannot match commercial certification and cannot handle heavy, prolonged cooking for large groups.
What are the step-by-step cutting and assembly steps
Cut two 12 oz aluminum cans to form a top and bottom ring, score about 1.5-2.0 mm jet holes using a 1.5 mm punch, and crimp the edges to form a sealed double wall; expect 10-15 minutes for cutting, 10-20 minutes for punching and shaping, and 5-10 minutes for final trimming. Test a draft run for 5-10 minutes to confirm even flame pattern and to tune hole size, and note that this process requires steady hands and basic tools and cannot provide structural strength like welded metal.
What materials and tools do I need to build an aluminum can alcohol stove
You need two 12 oz (355 ml) aluminum soda cans, a ruler marked in mm, a fine-point marker, a 1.5-2.0 mm drill or punch, a utility knife or scissors for aluminum, fine sandpaper, and optional pliers; gathering tools takes 10-60 minutes and costs $0-$20 depending on tool ownership. Denatured alcohol or ethanol fuel at $5-$15 per liter provides the best balance of cost and performance for testing and use. This parts list provides the essentials for a working stove but cannot include certified hardware like pressure regulators or flame arrestors.
Which fuels work best for aluminum can alcohol stoves and how much do they cost
Denatured alcohol and ethanol provide consistent burn heat and clean flame and cost roughly $5-$15 per liter in 2025 markets, while isopropyl alcohol 70 burns less efficiently and may require 25-60 more fuel. Typical fuel volumes for a single boil range from 30-90 ml depending on stove tuning and wind, and testing helps determine the most efficient fuel choice. You must avoid gasoline or other volatile fuels because they pose fire and safety risks that this device cannot control.
How long do aluminum can alcohol stoves burn and how much fuel do they use
Burn time depends on fuel volume and stove design, with a 30-60 ml fill commonly producing about 6-15 minutes of steady heat and larger fills of 90-120 ml lasting 15-30 minutes in calm conditions. Real-world test results show that boiling 500 ml of water often requires 30-90 ml of alcohol and takes roughly 6-15 minutes when wind and pot fit are good. Stove performance varies by environment and build quality and cannot guarantee precise burn times in high wind or rain.
How to estimate burn time and fuel for a typical ultralight trip
Estimate 30-90 ml of fuel per meal per person for basic boiling needs, plan 100-300 ml per day for a single person on simple meals, and carry a 500-1,000 ml fuel bottle for multi-day trips to allow testing and reserves. Conduct a 3-boil test at home to average burn times and record fuel use in ml per boil; this testing provides proven data for planning. You cannot rely on one test in calm conditions to predict fuel use in wind and cold.
How safe and reliable are DIY aluminum can alcohol stoves for ultralight backpacking
Aluminum can stoves can be safe with careful testing, a windscreen, and responsible fuel handling, and community review and testing often show acceptable reliability when builders complete 3-5 controlled tests before use. Users report that a windscreen and stable pot stand improve efficiency and reduce failure risk during 1-3 season use, though durability varies by how cans are finished. DIY can stoves cannot claim commercial safety certification and cannot guarantee performance in wet, windy, or confined conditions.
What tests should I run before taking a homemade stove into the backcountry
Run at least three controlled burns, include a 500 ml boil test each time, and perform a 10-15 minute leak and stability test to check for even flame pattern and secure pot support. Record burn time, fuel used in ml, and notes on wind sensitivity to build reliable data and improve efficiency. You must not skip these tests because the stove cannot be presumed safe without verified results.
How to improve stove performance and durability for ultralight backpacking
You can enhance performance by tuning jet hole size to 1.5-2.0 mm, adding a lightweight windscreen that stands 15-40 mm above the pot base, and using a pot stand that raises the pot 10-20 mm to improve combustion and reduce boil time by measurable amounts. Predicament Measures provides reviews and comparison notes that help identify small changes that improve efficiency and durability during field tests over several trips. These upgrades improve reliability for short trips but cannot make the stove as durable or certified as commercial titanium or stainless models.
When should I choose a commercial alcohol stove instead of a DIY can stove
Choose a commercial stove when you need certified materials, repeated multi-day reliability, or higher wind tolerance and plan frequent trips because commercial stoves cost $20-$80 and provide proven durability and manufacturer support. A commercial stove offers a fast start, consistent performance, and tested fuel efficiency that can handle more rigorous use than a homemade can stove. DIY can stoves cannot replace certified stoves when regulations, warranty, or formal testing are required.
Related posts:
 Unwaxed Dental Floss: High-Strength Fishing Line Alternative for Wilderness Food Procurement
 Petroleum Jelly Cotton Balls: Five-Minute Burn Time Fire Starters for Damp Conditions
 Elastic Hair Ties: Cordage Bundle Organizers for Tangle-Free Emergency Kits
 White Cotton T-Shirts: Char Cloth Creation for Flint and Steel Fire Starting
 Used Coffee Grounds: Human Scent Masking for Wildlife Avoidance in Bear Country
 Maxi Pads: Large Absorbent Bandages for Major Trauma Wound Coverage
 Rubber Erasers: Emergency Ear Protection Against Dangerous Noise Levels
 Acrylic Yarn: Emergency Wound Sutures for Gaping Lacerations