How To – Empty Tin Cans: Efficient Wood Gasifier Stove Construction for Fuel Conservation
By Predicament Measures
Quick Answer: Can an empty tin can wood gasifier stove conserve fuel and cook reliably
Yes an empty tin can wood gasifier stove can conserve fuel because gasification and improved airflow increase combustion efficiency compared with an open fire.
- Effectiveness: 30-50 typical fuel savings (thermal efficiency typically 20-35)
- Cost: build materials typically cost $0 to $10 using recycled cans and simple tools versus $30 to $120 for small commercial gasifier or rocket stoves
- Time: build time 30 to 180 minutes; first successful burn often within 10 to 20 minutes of lighting
- Limitation: cannot safely replace certified indoor stoves; cannot boil very large volumes quickly; has limited durability and requires good ventilation and dry fuel
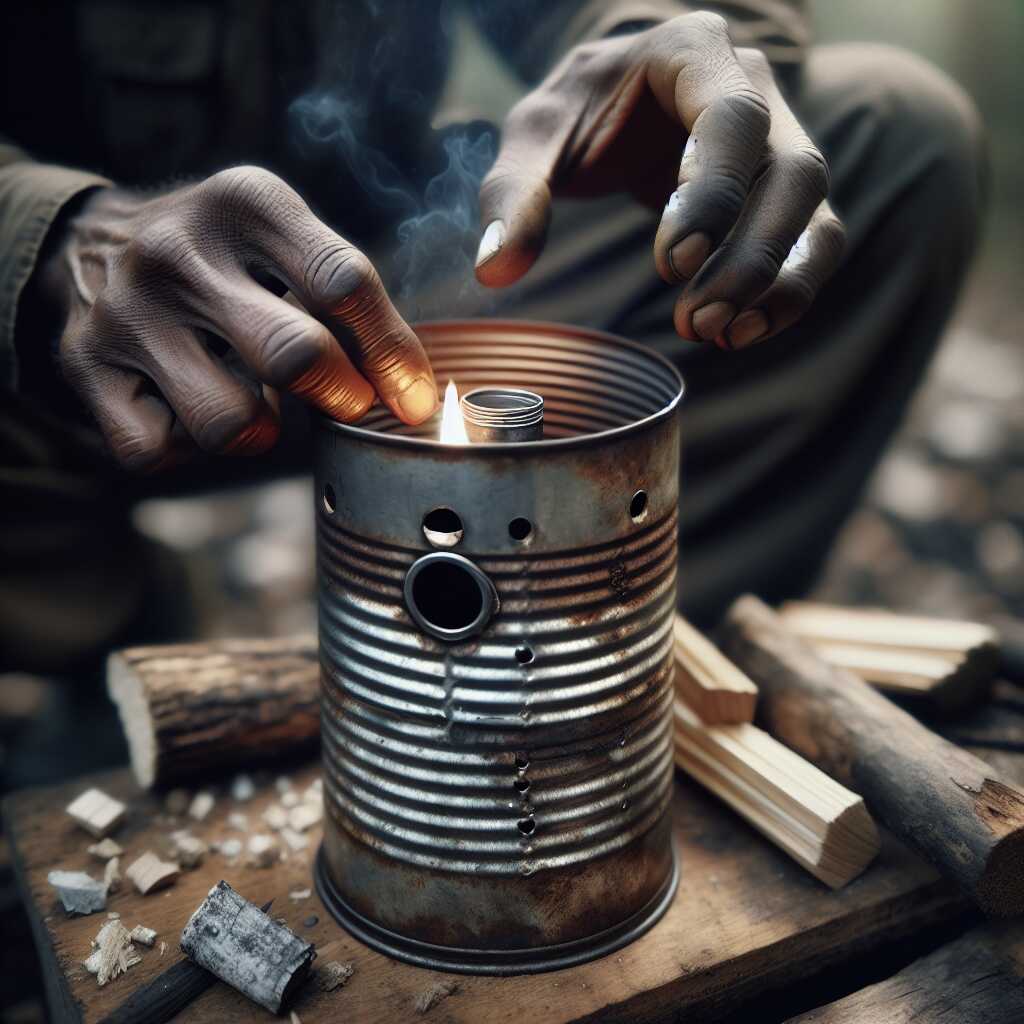
The empty tin can wood gasifier stove is a compact DIY stove built from recycled metal food cans that uses partial gasification and controlled airflow to burn wood more efficiently. This $0-$10 solution reduces fuel use and improves heat control compared to an open campfire and costs far less than small commercial gasifier or rocket stoves ($30-$120).
The process works through three key relationships: controlled airflow feeds the fuel bed resulting in more complete combustion and typical thermal efficiency of 20-35, secondary combustion (gasification of wood pyrolysis gases) mixes with preheated air enabling higher-temperature flames and lower visible smoke, and a compact metal containment channels heat to the pot creating measurable fuel savings of about 30-50 versus an open campfire.
How to build an empty tin can wood gasifier stove step by step
- Gather materials and safety gear (10-20 minutes): Collect 2 empty tin cans (one larger outer can 75-100 mm diameter and 100-150 mm tall, one smaller inner can 10-20 mm smaller in diameter so it fits inside), a piece of wire or metal mesh for a grate, a nail/awl or 4-6 mm drill bit for holes, tin snips or strong scissors, pliers, metal file, gloves and eye protection. Cost: $0-$10 if using recycled cans and basic tools. Result: you have all parts ready and PPE on.
- Prepare cans (5-15 minutes): Clean and dry cans, remove sharp label glue, punch tops off both cans using a can opener or sturdy knife (dispose of sharp lids). File any sharp edges. Result: two open-top cylinders ready to cut and modify.
- Size and cut inner can (15-45 minutes): Trim the inner (smaller) can so its height is about 60-80 of the outer can’s height (for example inner 60-100 mm, outer 100-150 mm). The annular gap should be about 10-20 mm around the inner can when inserted. Use tin snips and smooth edges with a file. Result: inner can fits inside outer can leaving an air channel for secondary air.
- Create primary air inlet holes (5-15 minutes): At the outer can base, punch or drill a ring of 6-12 holes about 4-6 mm diameter roughly 10-15 mm above the bottom to act as primary air inlets. Space holes evenly. Result: primary airflow will feed the base of the fuel/char bed to sustain combustion.
- Make secondary air / riser holes (5-15 minutes): Near the top of the annulus (about 20-30 mm below the top rim), punch 6-12 smaller holes (3-5 mm) through the outer can to allow preheated air to mix with pyrolysis gases. Result: secondary air supports gasification and cleaner burn.
- Install grate / ash clearance (5-20 minutes): Fashion a small metal grate or use a short wire ring to keep the fuel/char 8-20 mm above the base so ash can fall through the primary inlet area. Secure the grate to the inner can with tabs or wire. Result: a working fuel bed with ash clearance for sustained burn.
- Add pot support / chimney top (10-30 minutes): Cut and fold 3-4 tabs from the outer can rim or attach short metal legs so a cooking pot sits 10-30 mm above the top of the inner riser. Ensure the pot sits stable and allows the exhaust to flow around it. Result: a pot-rest and chimney that concentrates heat under the cookware.
- First lighting and tuning (10-20 minutes): Use small dry tinder and kindling placed in the inner riser. Light tinder, allow kindling to gasify and produce flames, then add small split sticks gradually. Expect the first successful steady gasifier flame within 10-20 minutes if fuel is dry. Tune by adjusting hole count and fuel size for a consistent blue/bright flame. Result: working stove with noticeable reduction in smoke and better heat transfer compared to an open fire.
- Routine use and maintenance (5-15 minutes per use): After each use let the stove cool, remove and dispose of ash, inspect for thinning metal or sharp edges, and re-file as needed. Typical performance: fuel savings of about 30-50 compared with an open campfire; thermal efficiency commonly 20-35 depending on fuel dryness and build quality. Result: longer stove life and consistently efficient burns if maintained.
- Know the limits and safe operation (ongoing): Never use the can gasifier indoors without proper ventilation or carbon monoxide detection; do not expect to boil very large volumes quickly; expect limited durability (metal will thin and corrode over months of regular outdoor use). For stable long-term use, consider commercial certified appliances. Result: safer operation and realistic expectations about capability and lifetime.
FAQ
what is an empty tin can wood gasifier stove one can design and size guide
An empty tin can wood gasifier stove is a small wood gasifier made from recycled metal cans that provides cleaner, more efficient heat for cooking and heating by enabling partial gasification and a focused combustion zone; expected thermal efficiency ranges from about 20 to 35 and typical fuel savings are about 30 to 50 versus an open campfire. A low-cost build uses 1 to 3 cans, common tools, and material cost from $0 to $10 when using recycled cans or $5 to $10 for new sheet metal and rivets; build time ranges from 30 to 180 minutes with many users reaching a first successful burn within 10 to 20 minutes. This design guide from Predicament Measures explains basic limits, notes that the unit cannot replace certified indoor appliances, and stresses that dry fuel, good ventilation, and routine testing improve reliability and life span.
what are the main parts and internal diameters in millimeters to use
The main parts include an inner combustion riser, an outer can body, a fuel feed or burn chamber, an air inlet area, a small grate or spacer, and a pot support, with common internal diameters and clearances of about 66 mm to 70 mm for a soda-can style inner riser and about 85 mm to 105 mm for a larger outer can or body that supports the pot. Use an annular gap of about 5 mm to 10 mm between inner and outer cans to enable secondary air and insulation, cut air inlet holes 3 mm to 6 mm diameter spaced every 10 mm to 20 mm at the base for primary air, set a grate or spacer height of 10 mm to 20 mm above the inlet plane, and position pot support 20 mm to 40 mm above the rim to balance heat transfer and stability. These sizes provide a compact, easily tested design that offers good draft and efficiency for 1 to 3-person cooking, and this layout cannot handle very large pots or continuous heavy-duty heating like commercial stoves.
how does an empty tin can wood gasifier stove work step by step for first burn
The stove works by burning small wood to create chars, then feeding heat and limited oxygen to gasify the char and burn wood gas in a hotter secondary zone, creating a blue, low-smoke flame within about 10 to 20 minutes of proper lighting when the design and fuel are correct. First, assemble dry kindling and a small disk of fuel in the burn cup and light the kindling to make a steady flame; second, add slightly larger sticks as flame grows and watch for reduced smoke as gasification starts; third, adjust air inlets and add short splits to maintain a steady hot flame for cooking. Users should test airflow, practice controlled feeding, and record results to enhance reliability and review performance before relying on the stove for critical needs.
what are the exact timings preparation lighting and airflow adjustments in minutes
Preparation typically takes 5 to 15 minutes to clean cans, cut holes, and set a small grate and pot stand, with full assembly often completed in 30 to 90 minutes depending on tools and skill. For first burn, kindling lights in 0 to 2 minutes, stable small-flame phase runs 2 to 5 minutes, transition to gasification usually occurs at 5 to 15 minutes after lighting when smoke decreases and flame becomes hotter, and steady cooking mode begins at 10 to 20 minutes; adjust primary air every 1 to 3 minutes during the first 10 minutes for stable draft. When adding fuel, place 1 to 3 small sticks (20 mm to 30 mm diameter) every 3 to 8 minutes during steady operation, test each adjustment, and record results to improve confidence and repeatable performance.
what are the main benefits of using an empty tin can wood gasifier stove for fuel
An empty tin can wood gasifier stove provides compact, low-cost heat that conserves fuel by creating hotter, cleaner combustion and typically delivers 30 to 50 less fuel use than an open campfire for similar tasks. The device costs little to build, often $0 to $10 using recycled parts, and it offers portability, quick warm-up often under 10 to 20 minutes, and useful performance for small pots and personal cooking that helps low-income households and campers stretch fuel supplies. Users should run simple tests and reviews to measure boil times and fuel use, track results, and compare this stove against commercial options that provide greater durability and certified safety.
how much fuel savings can I expect percent and boil time reductions in minutes
Fuel savings commonly range from about 30 to 50 compared with an open fire depending on fuel type and wind, and thermal efficiency for small tin-can gasifiers typically falls in the 20 to 35 range from community test data and published DIY reviews. For a typical 1 L pot of water, expect boil times to fall by roughly 2 to 8 minutes compared with an open campfire, so if an open fire takes 12 to 20 minutes you may see boiling in about 8 to 15 minutes depending on pot material, wind, and fuel size. These numbers depend on careful testing, good dry fuel, a well-built stove, and cannot guarantee fixed results for all conditions.
what are the risks and limitations of an empty tin can wood gasifier stove in practice
Main risks include carbon monoxide exposure, burns from hot metal and flames, sparks and stray embers, structural failure from thin metal, and the fact that these stoves cannot replace certified indoor heaters or professional cooking systems. The stove has limited durability because thin tin and can seams corrode and warp with repeated high heat, so expect varying life measured in hours to tens or low hundreds of hours depending on metal quality and care. Users must plan for testing, inspections, and replacement parts, and they must not use these stoves inside enclosed spaces due to pollution and safety limits.
what safety measures reduce carbon monoxide exposure burns and fire hazards
Reduce risk by using the stove only outdoors or in well-ventilated areas with a working CO detector nearby, keep a 3 m to 5 m clear area from flammable materials, and carry a small fire extinguisher or 1.5 kg fire blanket within 1 to 2 m for emergencies. Wear heat-resistant gloves and eye protection when fueling or adjusting the stove, use dry fuel under 20 moisture, keep pots stable on the support, and never leave the stove unattended while burning; these steps improve safety and reliability but cannot remove all risk of CO or fire. Predicament Measures recommends routine testing, practice burns in safe locations, and clear written checklist use for safe operation and review of results.
who should consider using an empty tin can wood gasifier stove in 2025 settings
Campers, survivalists, homesteaders, off-grid households, emergency planners, and low-income families can consider this stove as a low-cost, portable option that provides fuel savings, easy repair, and rapid testing for small-scale cooking and heating for 1 to 3 people. The stove suits short-term emergencies, backcountry cooking, practice and training, and situations where lightweight, low-cost equipment delivers value and proven fuel efficiency gains; it cannot meet the needs of larger households or replace certified indoor heating systems. Predicament Measures advises target users to run simple trials, compare reviews, and use safe setups to confirm that the stove meets their reliability and performance needs in 2025 conditions.
can campers survivalists and low income households realistically benefit and how much
Yes, these groups can realistically benefit with typical fuel savings of about 30 to 50 and boil-time reductions of 2 to 8 minutes for small pots, with build costs of $0 to $10 and quick testing cycles that show results within a few burns. Benefits depend on dry fuel, correct build dimensions, and user training; durability and heavy use costs will vary and may require replacement parts or stronger metal for long-term daily use. Users should perform simple reliability tests, keep a log of fuel use and boil times, and compare results before relying on the stove for critical or long-term needs.
when is the best time or situation to use an empty tin can wood gasifier stove outdoors
The best time to use an empty tin can wood gasifier stove is during short camping trips, emergency cooking, or outdoor heating when dry twig fuel is available and ventilation is good. This stove provides fuel savings of about 30 to 50 versus an open campfire and can reach thermal efficiency near 20 to 35 depending on fuel and build quality. This design cannot replace certified indoor stoves, cannot boil very large volumes quickly, and works best with small-diameter fuel and steady monitoring.
should I use the stove for daily cooking emergency use or short camping trips and why
You should use the stove for emergency use and short camping trips rather than daily heavy cooking because durability is limited and maintenance is frequent. The stove helps conserve fuel and often produces a first successful burn within 10 to 20 minutes, making it useful for quick meals and camp tasks. The stove does not provide the reliability or capacity of a certified home range and needs good ventilation and dry fuel for safe use.
how much does an empty tin can wood gasifier stove cost 0 to 10 usd compared to others
Building an empty tin can wood gasifier stove typically costs $0 to $10 when using recycled cans, basic fasteners, and common tools. Commercial small gasifier or rocket stoves usually cost about $30 to $120, which means the can stove offers a low-cost alternative while sacrificing long-term durability. This stove offers proven fuel savings but has shorter service life and higher maintenance needs than manufactured units.
what are expected maintenance costs lifespan and replacement intervals in months
Maintenance costs are usually low, commonly $0 to $10 per year for simple repairs like new screws, wire, or replacing a burned inner can. Typical lifespan ranges from about 1 month for heavy daily use up to 12+ months for occasional camping use, with inner burner parts often replaced every 1 to 6 months and outer body replaced every 6 to 24 months. Performance depends on corrosion, frequency of use, exposure to weather, and user care, which affects reliability and long-term cost.
what materials and tools are needed to build an empty tin can wood gasifier stove step by step
You need 2 to 3 empty tin cans, basic fasteners, a drill, cutting tools, safety gear, and small metal parts to build a working wood gasifier stove; common materials include one larger food can (about 14 oz, roughly 3.25″ diameter by 4.25″ tall) and one smaller can (6-8 oz, about 3″ diameter by 1.5″ tall) for the internal burn tube. Recommended fasteners and fittings include 1/8″ pop rivets or #6 sheet-metal screws 1/2″ long and stainless steel wire for clamping, with common drill bit sizes 1/8″ (3 mm) for pilot holes and 1/4″ (6 mm) to 3/8″ (9 mm) for air or feed holes. Use tin snips or a Dremel with a cutoff wheel, a small metal file, safety gloves, and eye protection to cut and finish edges so the assembly is safe and durable.
what exact can sizes fasteners drill bit sizes and cutting tools are recommended
Choose a larger food can around 14 oz (approx. 3.25″ diameter x 4.25″ height) for the outer shell and a smaller 6-8 oz can for the inner chamber; other pairings in the same size ratio work well. Use 1/8″ pop rivets or #6 sheet-metal screws 1/2″ long, drill bits 1/8″ (3 mm) for pilot holes, 1/4″ (6 mm) or 3/8″ (9 mm) for intake and secondary air, and cutting tools such as tin snips, a Dremel with a metal cutoff wheel, a metal file, gloves, and safety goggles. These parts and tools provide a simple, reliable build that enhances combustion and helps testing and review of stove performance by users.
what are the best alternatives to an empty tin can wood gasifier stove for cooking
The best alternatives are small manufactured rocket stoves, purpose-made wood gasifier kits, and commercial backpacking canister stoves that provide more durable construction and steadier cooking output. Rocket stoves and commercial kits are designed to improve combustion and often offer better efficiency, reliability, and longevity than improvised tin-can builds. Backpacking canister stoves deliver repeatable heat output and simple control, which helps when consistent boil times and safety are essential.
how do rocket stoves gasifier kits and commercial backpacking stoves compare in efficiency
Rocket stoves and gasifier kits usually deliver higher combustion efficiency and lower fuel use than an open fire and often outperform simple tin-can gasifiers on durability and draft control. Commercial backpacking canister stoves typically offer the most consistent thermal output and convenience, while rocket and gasifier kits provide fuel savings and solid performance for wood fuel users. Cost and portability vary widely, so a comparison of efficiency, cost, and user needs helps find the best option for a specific situation.
what common mistakes should be avoided when using an empty tin can wood gasifier stove
Common mistakes include using wet or oversized fuel, leaving gaps or leaks in the assembly, and running the stove indoors where ventilation is poor; these errors reduce efficiency and increase smoke. Overfeeding the stove causes smothering or heavy smoke and underfeeding causes short, weak burns that lower reliability and heat output. The stove cannot safely replace certified appliances and requires careful use, testing, and review by users before relying on it in critical situations.
how to prevent clogging over firing leaks and poor draft with quick fixes in minutes
To clear clogging, use a stick or metal rod to poke out ash and char from the burn tube and remove the inner can for a 2-5 minute cleanout, which often restores draft and heat. To stop over firing reduce fuel size to 2-3 cm diameter sticks, feed at a slower rate, tighten loose screws or add a wrap of stainless wire to seal leaks, and enlarge intake holes slightly (6-8 mm) if draft is weak. These quick fixes help improve reliability and efficiency, but regular maintenance and cautious testing remain essential for safe use.
Predicament Measures provides this guide to help users build, test, and review an empty tin can wood gasifier stove while understanding limits, safety, and performance.
Related posts:
 Unwaxed Dental Floss: High-Strength Fishing Line Alternative for Wilderness Food Procurement
 Mesh Produce Bags: Small Fish and Minnow Trap for Stream Protein Gathering
 550 Paracord Shoelaces: Hidden Survival Rope for Emergency Rappelling Situations
 White Cotton T-Shirts: Char Cloth Creation for Flint and Steel Fire Starting
 Used Coffee Grounds: Human Scent Masking for Wildlife Avoidance in Bear Country
 Maxi Pads: Large Absorbent Bandages for Major Trauma Wound Coverage
 Rubber Erasers: Emergency Ear Protection Against Dangerous Noise Levels
 Acrylic Yarn: Emergency Wound Sutures for Gaping Lacerations