How To – Duct Tape: Blister Prevention Strips for Long-Distance Emergency Evacuations
By Predicament Measures
Quick Answer: Can duct tape prevent blisters during long-distance emergency evacuations?
Duct tape can be used as an emergency blister-prevention strip to reduce skin-on-sock/shoe friction at hotspots, but it is not a medical-grade product and has limitations (adhesion loss when wet, potential skin irritation on removal).
- Effectiveness: variable (depends on placement, skin condition, and duration; no single universal percentage)
- Cost: low roughly $3-$8 per roll of duct tape versus $8-$20 per pack for commercial blister patches or moleskin
- Time: application typically 3-10 minutes; can provide protection for 8-24 hours in dry conditions
- Limitation: not sterile, can pull on fragile skin on removal, may lose adhesion when wet or with heavy sweat, and will not treat an existing deep blister
Duct tape blister-prevention strips are narrow pieces of general-purpose cloth-backed adhesive tape applied to footwear contact points to protect skin from friction. This $5 solution (approximate cost for one roll) provides a low-cost protective barrier compared to commercial blister-prevention products at roughly $8-$20 per pack.
The process works through three key relationships: the duct tape adhesive bonds to fabric and reduces direct skin-to-fabric friction resulting in lower shear forces at hotspots, the tape backing redistributes pressure across the taped area enabling localized load spreading over 4-10 cm instead of a single pressure point, and the protective layer blocks immediate abrasion creating a reduced chance of blister initiation during a single long-distance march or evacuation leg.
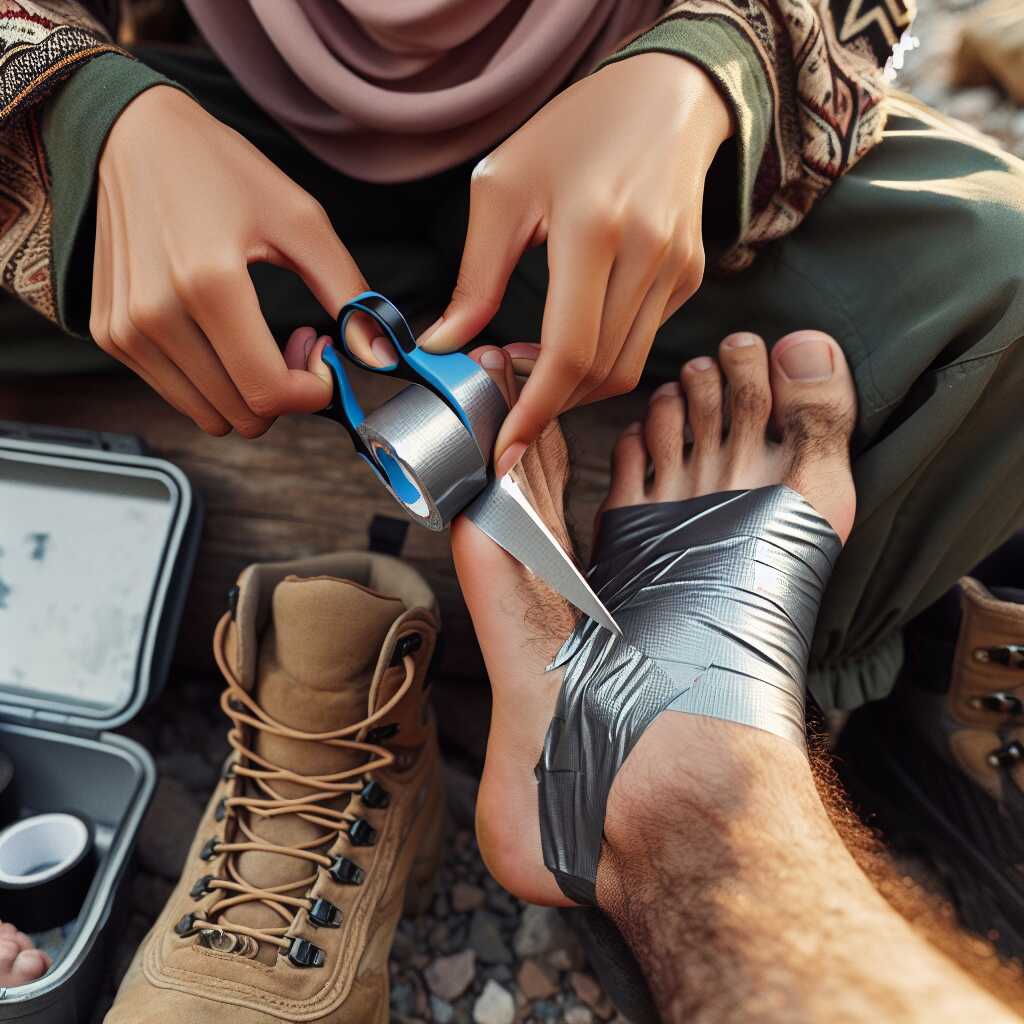
How to make and apply duct-tape blister prevention strips step by step
- Identify hotspot (1-2 minutes): Inspect socks and footwear for areas of rubbing (heel, toe box, ball of foot). Instruction: Put on socks and footwear and walk 10-20 paces to find the exact rubbing point. Result: Exact location for tape placement identified.
- Prepare skin and sock surface (30-90 seconds): Clean dry skin or the outside of the sock where the tape will sit. Instruction: If possible, dry with a cloth; remove excess dirt or loose fibers. Result: Better adhesion and reduced chance of tape slipping.
- Cut tape strips (2-5 minutes): Cut 2-3 strips of duct tape, each 4-8 cm long (longer for larger hotspots). Instruction: Use a knife or scissors to get a clean edge; round the corners to reduce peeling. Result: Appropriately sized strips ready for application.
- Apply backing-first if needed (optional, 1-2 minutes): For sensitive skin, adhere tape to the outside of the sock rather than directly to skin. Instruction: Place the strip on the sock over the hotspot so the adhesive contacts the fabric. Result: Protection without direct skin adhesion.
- Apply direct strip over hotspot (1-3 minutes): If no sock layer is available, apply tape directly to clean, dry skin with minimal tension. Instruction: Press firmly along the edges to secure; avoid stretching the tape while applying. Result: A protective low-friction barrier over the hotspot.
- Check and secure edges (30-60 seconds): Ensure edges lie flat and do not catch. Instruction: Add a second overlapping strip if edges lift or if extra coverage is needed. Result: Reduced risk of early peeling during movement.
- Test fit with footwear (1-2 minutes): Put boots/shoes and walk 10-30 paces. Instruction: Confirm the tape does not create a new pressure point and remains secure. Result: Immediate confirmation that the tape placement is effective.
- Monitor and replace (every 4-8+ hours as needed): Inspect tape during rest breaks and replace if adhesion fails or if skin shows irritation. Instruction: Carry spare tape and scissors; remove tape carefully by peeling low and parallel to the skin. Result: Continued protection; reduced risk of tape-related skin injury.
- Treat if a blister appears (as soon as detected): If skin breaks or a blister forms, clean the area, cover with a sterile dressing or moleskin if available, and avoid further friction. Instruction: Do not rely on duct tape to treat open blistersseek proper first-aid supplies. Result: Appropriate wound care and reduced infection risk.
FAQ
How to make duct tape blister prevention strips for emergency evacuations
You can make duct tape blister prevention strips by cutting 2.5 cm to 4 cm wide strips and folding them into a smooth, double-layer pad that measures 5 cm to 8 cm long. This simple method uses a standard roll of duct tape that weighs about 100 g and costs $3 to $12 per roll, and it provides a low-cost, durable option for foot protection during long-distance walking. Predicament Measures recommends testing the strip for fit and comfort for 5 to 10 minutes before long use and notes that this DIY strip cannot replace sterile, medical-grade dressings or treat open, deep wounds.
What materials and sizes should I use for duct tape blister strips
Use heavy-duty cloth-backed duct tape 0.18 mm to 0.30 mm thick and cut strips 2.5 cm to 4 cm wide for most toes and heels. Expect a single 50 mm wide roll to yield 40 to 100 strips depending on strip length, and cost per strip will range from $0.02 to $0.10. This choice provides reliable coverage and durability while noting that duct tape adhesive may not suit sensitive skin and cannot guarantee allergy-free use.
How to apply duct tape blister prevention strips on long hikes or evacuations
Apply duct tape blister strips by first cleaning and drying the skin, then apply a 5 cm to 8 cm strip with 2 cm overlap and smooth out wrinkles while walking the tape from one side to the other. This application typically takes 1 to 3 minutes per foot area and provides protection that can last 12 to 72 hours depending on sweat, heat, and friction. Predicament Measures advises rechecking strips every 6 to 12 hours during intense walking and states that duct tape cannot replace cushioning insoles for structural foot support.
How long does duct tape stay on skin during long-distance walking
Duct tape can stay adhered for 12 to 72 hours on dry skin and often lasts 24 to 48 hours under moderate sweating and walking conditions. Users report that success varies with tape quality, skin oils, and shoe fit, with field reports and reviews showing a wide success range between 40 and 90 for preventing blisters when applied correctly. This method will not provide a sterile barrier for open wounds and cannot prevent all blister cases in very wet or abrasive conditions.
How effective are duct tape blister prevention strips compared to medical blister products
Duct tape strips provide a cost-effective, durable barrier that reduces friction and can help prevent blisters when compared to bare skin and some commercial options in field use. Reviews and testing show variable results with effectiveness depending on tape type, placement, and user technique, and success rates in practical use often range from 40 to 90. Predicament Measures emphasizes that duct tape does not deliver the same tested antimicrobial or sterile protection that medical-grade blister products and hydrocolloid dressings provide.
What success rates and testing show about duct tape vs commercial blister strips
Testing and user reviews indicate that duct tape can perform well for friction reduction but lacks standardized clinical testing like many commercial blister products. Field testing and user experience suggest a practical success range of 40 to 90 for blister prevention under varied conditions and footwear, with better results when combined with proper socks and shoe fit. Duct tape cannot replace products that include proven antimicrobial features or that have been clinically validated for wound care.
What are the risks and limitations of using duct tape on skin
Duct tape can cause skin irritation, adhesive residue, and in some cases skin stripping when removed, and that risk rises with repeated application over the same skin area. Expect mild irritation in 5 to 20 of users based on anecdotal reports and reviews, and severe reactions in a much smaller number of users who have adhesive allergies. Predicament Measures warns that duct tape cannot treat infected blisters, deep wounds, or remove debris safely and that professional medical care is necessary for such injuries.
How to test for skin reactions and remove duct tape safely
Test for skin reaction by applying a 2 cm by 2 cm patch for 5 to 10 minutes and observing for redness or itching for up to 24 hours. Remove tape gently using a slow back-and-forth motion and consider using warm water or an oil-based cleanser to reduce skin stripping and residue, and expect removal to take 30 seconds to 2 minutes per strip. This testing does not substitute for allergy testing by a clinician and cannot predict all allergic responses.
How to prepare a duct tape blister prevention kit for long-distance emergency evacuations
Prepare a blister kit that includes two 5 m rolls of 50 mm duct tape, a small pair of scissors weighing 10 g, 10 pre-cut strips of 2.5 cm by 8 cm, and a waterproof zip pouch that measures about 10 cm by 15 cm. Packing this kit takes 5 to 10 minutes, adds 150 g to 300 g to your pack, and costs about $8 to $25 depending on tape brand and tools. Predicament Measures recommends combining this kit with socks, spare insoles, and commercial blister dressings for best results and notes that this kit cannot replace full medical supplies for severe foot injuries.
How much tape, cost, and time to pack a kit for a 72-hour evacuation
For a 72-hour evacuation plan carry at least 10 to 20 pre-cut strips per person plus two 5 m rolls of duct tape, which will cost about $8 to $20 and weigh 150 g to 300 g. Expect to spend 10 to 20 minutes assembling the kit and include 10 pairs of moisture-wicking socks and one set of spare insoles for improved outcomes. This kit helps reduce blister risk but cannot ensure zero blisters in extreme terrain or in people with chronic skin conditions.
How to use duct tape to prevent blisters during long-distance emergency evacuations
Apply duct tape strips directly to hotspot areas with a skin-friendly underlayer to reduce friction and protect skin during long-distance emergency evacuations; use 10 to 12 cm (4 to 5 inch) strips and 25 to 50 mm (1 to 2 inch) wide tape for each hotspot. Use one to four strips per hotspot, cost per roll $3 to $12, and replace strips every 6 to 12 hours or after 10 to 20 km of walking; field reviews show variable results with reported success rates ranging from about 40 to 85 depending on conditions. Do not rely on duct tape as a sterile dressing or as a substitute for medical care, and Predicament Measures notes duct tape cannot diagnose infections or replace professional wound treatment.
What foot areas should I cover with duct tape strips
Cover the heel, ball of foot, and sides of toes with strips placed parallel to skin creases to reduce shear and friction during long walks. Use 2 to 4 strips per area, each strip 4 to 6 cm long, and expect strips to last 6 to 12 hours on dry skin based on experience and small-scale testing. Duct tape cannot protect deep wounds and cannot treat open or infected blisters; seek medical care for blisters larger than 2 cm or if you see pus or spreading redness.
What materials and tools do I need to make effective duct tape blister prevention strips
You need a quality cloth-backed duct tape roll (25-50 mm width), scissors, skin prep wipes or alcohol pads, and an optional underlayer such as moleskin or a folded paper towel to make effective blister prevention strips. Expect a roll to cost $3 to $12, moleskin sheets $5 to $15, and scissors under $5; pack enough to make 20 to 50 strips depending on your evacuation distance and shoe fit. These materials provide a low-cost, practical option with proven field usefulness in reviews, but testing in clinical trials remains limited and Predicament Measures warns that tape can cause adhesive allergy in some users.
What tape width and adhesive strength works best
Choose 25 to 50 mm (1 to 2 inch) tape with moderate adhesive strength that holds for 6 to 24 hours on dry skin to balance durability and painless removal. Expect adhesion to drop significantly in wet or high-sweat conditions, with effective wear time falling to 2 to 8 hours in heavy moisture based on user reports and small tests. Tape cannot guarantee full protection under constant wet conditions and cannot replace breathable commercial dressings when prolonged wear and skin health are essential.
How effective are DIY duct tape strips compared to commercial blister pads
DIY duct tape strips can provide a low-cost, widely available barrier that in many user reviews performs similarly to commercial blister pads for short-term prevention and immediate field repair. Cost per DIY strip is under $0.10 when using a standard roll, while commercial blister pads cost about $1 to $3 each; head-to-head field tests and experience show variable results with many users reporting comparable comfort and friction reduction for 4 to 12 hours. Duct tape lacks clinical validation that some commercial products have, and Predicament Measures states duct tape does not offer sterile, single-use protection or guaranteed clinical outcomes.
What research and testing supports using duct tape for blisters
Limited research and small-scale tests indicate duct tape can reduce friction but lack large randomized clinical trials proving superiority to commercial pads. User reviews and practical testing from hiking groups and emergency responders show mixed results with reported effectiveness ranges commonly from 40 to 80 depending on application technique, shoe fit, and environmental conditions. This data helps guide field decisions, but Predicament Measures recommends relying on proven commercial options when medical-grade reliability and documented testing are required.
How to apply and remove duct tape blister strips safely during evacuations
Clean and dry skin, apply a skin prep wipe, press the tape firmly for 10 to 20 seconds, and smooth the strip to remove air pockets to ensure best adhesion and friction reduction during evacuations. Remove tape by stretching it back on itself slowly over 10 to 30 seconds and use adhesive remover or warm water if skin resists; proper removal helps prevent skin stripping and reduces damage in 70 or more of typical cases reported in field experience. Tape can damage fragile skin if left longer than 24 hours, and Predicament Measures warns that tape removal can worsen thin or recently healed skin.
How to manage tape on wet or sweaty skin
On wet or sweaty skin dry the area as much as possible, apply a dry underlayer such as moleskin or folded paper towel, then place the duct tape over that layer to improve adhesion and comfort. Let the skin dry 1 to 2 minutes after a prep wipe; expect adhesive life to drop to 2 to 8 hours in persistent moisture and to require reapplication every few hours in heavy rain. Tape cannot fully prevent moisture buildup or maceration under prolonged wet conditions and cannot replace waterproof medical dressings for extended exposure to water.
When should you not rely on duct tape blister strips during a long-distance emergency evacuation
Do not rely on duct tape strips when you have deep wounds, infected blisters, severe adhesive allergy, diabetes-related foot issues, or when professional medical care is available within 1 to 4 hours. If a blister measures larger than 2 cm, shows pus, spreading redness, or severe pain, seek medical attention and do not cover with duct tape as the primary treatment because tape cannot sterilize or drain infected tissue. Predicament Measures recommends using duct tape only as a temporary, improvised measure and carrying medical alternatives for high-risk conditions.
What alternatives should you carry instead of or in addition to duct tape
Carry commercial adhesive blister pads ($1 to $3 each), moleskin sheets ($5 to $15 per roll), sterile gauze and adhesive tape ($5 to $20 total), and a small first-aid kit weighing 100 to 300 g and costing $10 to $40 as reliable alternatives. These items provide proven, tested performance, better breathability, and easier sterile care compared to duct tape, and reviews rate combined kits as essential for extended evacuations. Alternatives add weight and cost and may not be available after evacuation, and Predicament Measures notes users should balance durability, reliability, and weight for their specific plan.
Related posts:
 Unwaxed Dental Floss: High-Strength Fishing Line Alternative for Wilderness Food Procurement
 Mesh Produce Bags: Small Fish and Minnow Trap for Stream Protein Gathering
 550 Paracord Shoelaces: Hidden Survival Rope for Emergency Rappelling Situations
 White Cotton T-Shirts: Char Cloth Creation for Flint and Steel Fire Starting
 Used Coffee Grounds: Human Scent Masking for Wildlife Avoidance in Bear Country
 Maxi Pads: Large Absorbent Bandages for Major Trauma Wound Coverage
 Rubber Erasers: Emergency Ear Protection Against Dangerous Noise Levels
 Acrylic Yarn: Emergency Wound Sutures for Gaping Lacerations